Showing posts with label 2. Show all posts
Showing posts with label 2. Show all posts
Wednesday, February 18, 2015
C program to find the sum of series 1 2 4 5 7 8
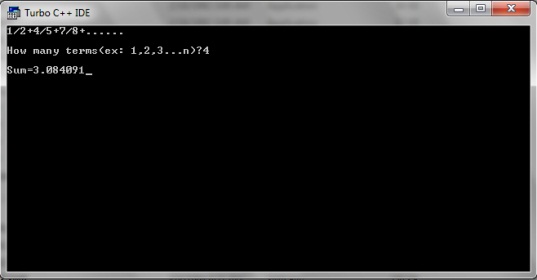
#include<stdio.h>
#include<conio.h>
void main()
{
int i,n;
clrscr();
float sum=0,x,a=1;
printf("1/2+4/5+7/8+......");
printf("
How many terms(ex: 1,2,3...n)?");
How many terms(ex: 1,2,3...n)?");
scanf("%d",&n);
for(i=0;i<n;++i)
{
x=a/(a+1);
sum+=x;
a+=3;
}
printf("
Sum=%f",sum);
Sum=%f",sum);
getch();
}

Monday, February 16, 2015
switch statement in C Part 2
Read: switch statement in C - Part 1
In the last tutorial I told you about the syntax and working of a program using switch keyword. Well in day to day programming we generally don’t use that syntax in C. This is because if we use the earlier method then it will execute all the subsequent statements after the condition turns true.
Syntax
switch(integer expression)
{
case constant 1: Statement 1;
break;
case constant 2; Statement 2;
break;
. . . . . .
. . . . . .
default: Statement 3;
}
Explanation of the above syntax
Well the whole syntax is almost same. But in the above syntax we have added break keyword after the cases. Remember we generally do not use continue keyword with switch.
Working of break keyword in switch statement
As you can see I have given break keyword after every case. Its working in switch case is almost same as in loops. If the compiler encounters break keyword in switch then it will take the control to the outside of switch block.
The perfect way to understand it is through a program.
Output

Explanation
Points to remember
In the last tutorial I told you about the syntax and working of a program using switch keyword. Well in day to day programming we generally don’t use that syntax in C. This is because if we use the earlier method then it will execute all the subsequent statements after the condition turns true.
switch statement in C
So we need a syntax that will execute only a certain set of statements when the condition turns true. So lets checkout the advance modification of switch statement with break keyword.Syntax
switch(integer expression)
{
case constant 1: Statement 1;
break;
case constant 2; Statement 2;
break;
. . . . . .
. . . . . .
default: Statement 3;
}
Explanation of the above syntax
Well the whole syntax is almost same. But in the above syntax we have added break keyword after the cases. Remember we generally do not use continue keyword with switch.
Working of break keyword in switch statement
As you can see I have given break keyword after every case. Its working in switch case is almost same as in loops. If the compiler encounters break keyword in switch then it will take the control to the outside of switch block.
 |
| Flowchart of switch statement in C - Image Source |
The perfect way to understand it is through a program.
#include<stdio.h>

void main()
{
 int i=10;

 switch(i)
 {
  case 1: printf("Hey its 1");
   break;

  case 10: printf("Hey its 10");
    break;

  case 7: printf("Hey its 7");
   break;

  default: printf("Hey its default");
 }
}
Output
- In the beginning of the program I have declared an integer variable with value 10.
- After that I have written switch keyword with integer expression i. It means the compiler will check the value of i (which is 10) with all the cases.
- In the first case I have written integer constant ‘1’ which turns false. So compiler will skip that case.
- In the second case I have written integer constant ‘10’ which turns true. So compiler will execute the statements under that case.
- Now just after the printf() function I have written a break keyword. So it will take the control of the program outside the switch block.
Points to remember
- You can also write multiple statements under each case to execute them. And you will not need to give separate braces for them, as the switch statement executes all statements once the condition turns true.
- Remember default keyword is optional. Its completely depend on us whether we want it or not in our program.
- The order of cases and default in the switch block do no matter. You can write them in any order but you must take care of proper use of break after each case.
Thursday, February 12, 2015
Leawo PowerPoint to Video Pro 2 2 0 55 Full Version with serial key and patch

Convert PowerPoint to video in most formats. Leawo PowerPoint to Video Pro is a wonderful PowerPoint to video conversion program that assists in converting your PowerPoint presentations and slideshows to quality videos for uploading to video-sharing websites like YouTube and playing on portable devices like iPad, iPod and iPhone, while retaining all the animations, slide transitions, sounds and video clips in the source PowerPoint. #
The PPT to Video conversion tool offers an innovative way for you to deliver anything made in PowerPoint, from Math homework to Makeup ads, from courseware to church sermons, fast and faithfully to the recipients via a video-welcome site.
Convert PowerPoint to video of 23 formats
Transfer your PowerPoint to the video format you prefer. Create a variety of video slideshows, regular ones including ASF, AVI, FLV, MPEG, MP4, TS, MOV, WMV, VOB, 3GP, and rare ones like RM, RA, MKV, MKA, Wii AVI, Wii MOV, NDS DPG, NDS DPG2, NDS DPG3 and NDS DPG4. Extract a sound from PowerPoint and turn it to a different audio format, e.g. *.aac, *.ac3, *.mp3.
Support multiple PowerPoint versions as input
Convert PowerPoint 2010, 2007, 2003, 2002, 2000 files to almost all kinds of video formats. With the support for free PowerPoint Viewer 2010 and 2007, you are able to convert PowerPoint to video without Microsoft Office Suite installed on your computer. Good for Microsoft Office PowerPoint fans who want more video copies of their PowerPoint presentations.
Batch Conversion for PowerPoint files
Process multiple PPT files per conversion. The input file formats supported by this PowerPoint to video converter include PPT, PPS, POT, PPTX, PPSX, POTX, etc. Create a separate video for each input PPT file.
Convert PPT to video for multiple web services
Export a PowerPoint presentation to popular web video like Audio Video Interleaved, Flash Video, Windows Media video, Apple QuickTime Movie and more, making it accessible on YouTube, Google Video, your blogs and many other video-sharing sites.
Output video for diverse end-devices
Apart from specific video file format, this PowerPoint to video conversion tool also offers non-tech savvy users a comfort to choose a proper video output - to choose by terminal device of their PowerPoint video, which features Apple TV, Blackberry, iPod, iPad, iPhone, PSP, PS3 (HD support), Pocket PC, Zen, Zune, XBOX, and etc.
Multi-lingual User Interface for easier conversion
Leawo PowerPoint to Video Pro is set with a neat GUI in 7 most-spoken languages, i.e. French, German, Italian, Simplified and Traditional Chinese, to give you quick access to your video slideshow.
Keep everything from original PowerPoint to output video
Retain all original elements, particularly dynamic effects like music, flash, movie clips from a selected PowerPoint file to final video. You can modify the video settings in the Profile of the PPT to video converter and make your own.
Insert background music & record real-time narration
The Music feature of this cool PowerPoint to video converter allows you to add background music or your recorded narration for the video slideshow. You can insert as many soundtracks as you like. You can also add watermark or logos to credit your work. Adjust the video layout with photo frame you can create a perfect video out of ordinary PowerPoint.
Process fast and precisely with a timeline
Convert your all-ready PowerPoint presentations to videos in no minute. Display the exact process of each PPT file with precise conversion time. Preview the output video during the conversion process.

I hope you like it......!
Wednesday, February 11, 2015
2 Photorealistic T Shirt PSD Mock ups

Free Download 2 Photorealistic T-Shirt Mock-ups PSD. Background easily editable, you can change the background color or add the texture you want. Enjoy!
Type : PSD
Category : Mockups
License : Free
Author : Pixelbuddha
Download
Thursday, February 5, 2015
NETTAB SKAT 3G QUAD v4 2 2 Android Tablet firmware
NETTAB SKAT 3G QUAD NT-3805C v4.2.2 Android tablet firmware
Specifications:
LCD | |
Screen Resolution | |
Processor | |
Chipset / Boxchip | |
RAM | |
Built in Memory | |
External Memory | Support Micro Card (MAX 32GB) |
Wifi | |
Blue tooth | |
3G | |
Camera | |
HDMI | Supported |
Speaker | Built IN |
Weight | 0.623 KG |
Android Version | 4.0 ICS |
Flashing Tool | RKbatch Tool |
Flashing Tutorials | Flashing Tutorial for Rockchip |
Download Official Updates
Piranha Ultra II 2 Tab 7 0 Tablet Firmware
Piranha Ultra II Tab 7.0 (Rockchip)

Tablet Spec:
RK30661.6 GHz Dual Core
8 GB
1 GB DDR3 RAM
2.0 MP front and 2.0 MP Rear Camera
HDMI
3G
WIFI

Wiki
Read article about Rockchip CPU on WikipediaKnowledge base :
What board ID , Tablet CPU Chip ,Firmware Number does my Tablet have ?
Frequently Asked Question about Android Tablets
When I need to Restore or Reset my Android Tablet Pc?
1. Forgotten Pattern Lock .
2.Too many pattern attempts / Reset user lock.
3. Tablets PC stuck on Gmail account.
4. Android Tablets PC stuck on Android logo.
5. Tablet Android hang on start up / Multiple errors generating by OS.
6. Android Market having problems or generating errors.
7.Upgrading to new Android OS.
6. Android Market having problems or generating errors.
7.Upgrading to new Android OS.
Download here 4.1 Jelly Bean
NOTE : This tablet will be flash with RKTool .This tablet belongs to RockChip.
Instructions:
you can use this Android Tablet firmware, Stock ROM to restore your Android China tablets to generic firmwares or upgrades . Make sure to charge battery . Power failure during flashing may result dead or broken tablets.
.
.
Note : Flashing generic tablet firmware should be last option.
Flashing Tutorials :
Read Before : Flashing Tutorial for Rockchip
Download Flashing Instructions : PDF
Drivers for Rockchip:
Download Drivers for Rockchip tablets
Flashing Tools:
Download: RKbatch Tool
Recommended Tools:
you can also use:Android Tools for Rockchip Tablets
Tuesday, February 3, 2015
Creating Advanced Alert Window class Part 2
In this tutorial well add basic window drawing code, as well as the ability to set size and position of the window.
Start by opening AdvAlertManager.as class and adding 4 new variables:
The windows array will hold references to all the windows. The defaultContainer value will be passed to the object through constructor - this will be the reference to the parent of the windows. The pWidth and pHeight values are also passed through constructor. These represent the width and height of the parent.
Now, receive these values and set them to respective variables in constructor:
Now well add 3 new parameters to the alert() method. All of them are optional. These are: width, height and position. The first two values are integers, and the third one is a Point. Set their defaults to 300, 200 and null. In the function, we check if position is null (was not specified by the user), and calculate position to center the window.
Then create a new instance of AdvAlertWindow class, pass 4 values to the constructor - text, width, height and position.
Push this object to windows array and add it to defaultContainer.
Full code so far:
Now create a new file in the same directory as AdvAlertManager.as - AdvAlertWindow.as.
Make this class extend MovieClip. Declare 4 private variables, which will hold text, width, height and position values:
Set values to these variables in the constructor. In the end of the constructor code, call updateDraw():
The updateDraw() function currently draws a gray rectangle based on the data:
Full AdvAlertWindow:
Now return to main.as.
Here I set up a simple example of using the features we added today. Take a look at the code:
Thats all for today!
Thanks for reading!
Read more »
Start by opening AdvAlertManager.as class and adding 4 new variables:
private var windows:Array;
private var defaultContainer:DisplayObjectContainer;
private var pWidth:int;
private var pHeight:int;
The windows array will hold references to all the windows. The defaultContainer value will be passed to the object through constructor - this will be the reference to the parent of the windows. The pWidth and pHeight values are also passed through constructor. These represent the width and height of the parent.
Now, receive these values and set them to respective variables in constructor:
public function AdvAlertManager(defaultWindowContainer:DisplayObjectContainer, parentWidth:int, parentHeight:int)
{
trace(": AdvAlertManager instance created.");

defaultContainer = defaultWindowContainer;
pWidth = parentWidth;
pHeight = parentHeight;
windows = [];
}
Now well add 3 new parameters to the alert() method. All of them are optional. These are: width, height and position. The first two values are integers, and the third one is a Point. Set their defaults to 300, 200 and null. In the function, we check if position is null (was not specified by the user), and calculate position to center the window.
Then create a new instance of AdvAlertWindow class, pass 4 values to the constructor - text, width, height and position.
Push this object to windows array and add it to defaultContainer.
public function alert(text:String, width:int = 300, height:int = 200, position:Point = null):void {
if (position == null) position = new Point((pWidth / 2) - (width / 2), (pHeight / 2) - (height / 2));
var w:AdvAlertWindow = new AdvAlertWindow(text, width, height, position);
windows.push(w);
defaultContainer.addChild(w);

trace("Message: " + text);
}
Full code so far:
package com.kircode
{
import flash.display.DisplayObjectContainer;
import flash.display.MovieClip;
import flash.geom.Point;
/**
 * Advanced Alert window manager.
 * @author Kirill Poletaev
 */
public class AdvAlertManager
{
private var windows:Array;
private var defaultContainer:DisplayObjectContainer;
private var pWidth:int;
private var pHeight:int;

/**
 * AdvAlertManager constructor.
 * @paramdefaultWindowContainer Parent container of alert windows.
 * @paramparentWidth Containers width.
 * @paramparentHeight Containers height.
 */


public function AdvAlertManager(defaultWindowContainer:DisplayObjectContainer, parentWidth:int, parentHeight:int)
{
trace(": AdvAlertManager instance created.");

defaultContainer = defaultWindowContainer;
pWidth = parentWidth;
pHeight = parentHeight;
windows = [];
}

/**
 * Create an alert window.
 * @paramtext Text value of the alert window.
 * @paramwidth (Optional) Width of the alert window. 300 by default.
 * @paramheight (Optional) Height of the alert window. 200 by default.
 * @paramposition (Optional) Coordinates of top-left corner of the alert window. If not specified - the window is centered.
 */

public function alert(text:String, width:int = 300, height:int = 200, position:Point = null):void {
if (position == null) position = new Point((pWidth / 2) - (width / 2), (pHeight / 2) - (height / 2));
var w:AdvAlertWindow = new AdvAlertWindow(text, width, height, position);
windows.push(w);
defaultContainer.addChild(w);

trace("Message: " + text);
}

}

}
Now create a new file in the same directory as AdvAlertManager.as - AdvAlertWindow.as.
Make this class extend MovieClip. Declare 4 private variables, which will hold text, width, height and position values:
private var t:String;
private var w:int;
private var h:int;
private var pos:Point;
Set values to these variables in the constructor. In the end of the constructor code, call updateDraw():
public function AdvAlertWindow(pt:String, pw:int, ph:int, ppos:Point)
{
t = pt;
w = pw;
h = ph;
pos = ppos;
updateDraw();
}
The updateDraw() function currently draws a gray rectangle based on the data:
public function updateDraw():void {
this.graphics.clear();
this.graphics.beginFill(0xcccccc, 1);
this.graphics.drawRect(pos.x, pos.y, w, h);
this.graphics.endFill();
}
Full AdvAlertWindow:
package com.kircode
{
import flash.display.MovieClip;
import flash.geom.Point;
/**
 * Advanced Alert window object.
 * @author Kirill Poletaev
 */
public class AdvAlertWindow extends MovieClip
{
private var t:String;
private var w:int;
private var h:int;
private var pos:Point;

public function AdvAlertWindow(pt:String, pw:int, ph:int, ppos:Point)
{
t = pt;
w = pw;
h = ph;
pos = ppos;
updateDraw();
}

public function updateDraw():void {
this.graphics.clear();
this.graphics.beginFill(0xcccccc, 1);
this.graphics.drawRect(pos.x, pos.y, w, h);
this.graphics.endFill();
}

}

}
Now return to main.as.
Here I set up a simple example of using the features we added today. Take a look at the code:
package
{
import com.kircode.AdvAlertManager;
import flash.display.MovieClip;
import flash.events.Event;
import flash.geom.Point;
/**
 * ...
 * @author Kirill Poletaev
 */
public class main extends MovieClip
{
private var AlertManager:AdvAlertManager;

public function main()
{
addEventListener(Event.ADDED_TO_STAGE, init);
}

private function init(evt:Event):void {
AlertManager = new AdvAlertManager(this, stage.stageWidth, stage.stageHeight);
AlertManager.alert("This is a test message!");
// Same results as:
// AlertManager.alert("This is a test message!", 300, 200, new Point(125,100));
}

}

}
Thats all for today!
Thanks for reading!
Subscribe to:
Posts (Atom)