Showing posts with label with. Show all posts
Showing posts with label with. Show all posts
Tuesday, February 17, 2015
Huffman Coding Algorithm With Example
Huffman coding algorithm was invented by David Huffman in 1952. It is an algorithm which works with integer length codes. A Huffman tree represents Huffman codes for the character that might appear in a text file. Unlike to ASCII or Unicode, Huffman code uses different number of bits to encode letters. If the number of occurrence of any character is more, we use fewer numbers of bits. Huffman coding is a method for the construction of minimum redundancy codes.
Also Read: Kruskal’s Algorithm for Finding Minimum Cost Spanning Tree
Huffman tree can be achieved by using compression technique. Data compression have lot of advantages such as it minimizes cost, time, bandwidth, storage space for transmitting data from one place to another.
In regular text file each character would take up 1 byte (8 bits) i.e. there are 16 characters (including white spaces and punctuations) which normally take up 16 bytes. In the ASCII code there are 256 characters and this leads to the use of 8 bits to represent each character but in any test file we do not have use all 256 characters. For example, in any English language text, generally the character ‘e’ appears more than the character ‘z’. To achieve compression, we can often use a shorter bit string to represent more frequently occurring characters. We do not have to represent all 256 characters, unless they all appear in the document. The data encoding schemes broadly categorized in two categories.
Fixed Length Encoding Scheme
Fixed length encoding scheme compresses our data by packing it into the minimum number of bits i.e. needed to represent all possible values of our data. The fixed length code can store maximum 224,000 bits data.
Variable Length Encoding Scheme
In variable length encoding scheme we map source symbol to variable number of bits. It allows source to be compressed and decompressed with zero error.
Construction of Huffman Code
A greedy algorithm constructs an optimal prefix code called Huffman code. The algorithm builds the tree T corresponding to the optimal code in a bottom-up manner. It begins with a set of |C| leaves (C is the number of characters) and perform |C| - 1 ‘merging’ operations to create the final tree. In the Huffman algorithm ‘n’ denotes the number of set of characters, z denotes the parent node and x & y are the left & right child of z respectively.
Also Read: Dijkstra Algorithm for Finding Shortest Path of a Graph
Huffman (C)
1. n=|C|
2. Q=C
3. for i=1 to n-1
4. do
5. z=allocate_Node()
6. x=left[z]=Extract_Min(Q)
7. y=right[z]=Extract_Min(Q)
8. f[z]=f[x]+f[y]
9. Insert(Q,z)
10. return Extract_Min(Q)
Analysis
The Q is initialized as a priority queue with the character C.
Q=C can be performed by using Build_Heap in O(n) time.
For loop takes (|n|-1) times because each heap operation requires O(log n) time.
Hence the total running time of Huffman code on the set of n characters is O(n log n).
Method
The following general procedure is applied for construction a Huffman tree:
Search for the two nodes having the lowest frequency, which are not yet assigned to a parent node.
Couple these nodes together to a new interior node.
Add both the frequencies and assign this value to the new interior node.
The procedure has to be repeated until all nodes are combined together in a root node.
Huffman Coding Example
Construct a Huffman tree by using these nodes.
| Value | A | B | C | D | E | F |
| Frequency | 5 | 25 | 7 | 15 | 4 | 12 |
Solution:
Step 1: According to the Huffman coding we arrange all the elements (values) in ascending order of the frequencies.
| Value | E | A | C | F | D | B |
| Frequency | 4 | 5 | 7 | 12 | 15 | 25 |
Step 2: Insert first two elements which have smaller frequency.

| Value | C | EA | F | D | B |
| Frequency | 7 | 9 | 12 | 15 | 25 |
Step 3: Taking next smaller number and insert it at correct place.

| Value | F | D | CEA | B |
| Frequency | 12 | 15 | 16 | 25 |
Step 4: Next elements are F and D so we construct another subtree for F and D.

| Value | CEA | B | FD |
| Frequency | 16 | 25 | 27 |
Step 5: Taking next value having smaller frequency then add it with CEA and insert it at correct place.

| Value | FD | CEAB |
| Frequency | 27 | 41 |
Step 6: We have only two values hence we can combined by adding them.

Huffman Tree
| Value | FDCEAB |
| Frequency | 68 |
Now the list contains only one element i.e. FDCEAB having frequency 68 and this element (value) becomes the root of the Huffman tree.
If you find anything missing or incorrect in above tutorial then please mention it by commenting below.

Monday, February 16, 2015
Wow Slider 4 x full version with crack free download

Hello Users my name is HarryBest and today im telling you the way to remove watermark from wowslider very easily. You can also remove the watermark from wowslider by just follow these steps:
Step 1: Install your WowSlider 4.8 software from here: Download
Step 2: After installing WowSlider create you project and publish it
Step 3: Copy the crack and paste it into "engine1 folder" which is in your publish project folder.
Download Crack: Link 1 ; Link 2
Step 4: The Last one Step is Copy your real images and paste them into your
"your publish project folder/data1/images"
For example
"your publish project folder/data1/images"
For example
This is real image
.png)
This is your image in your publish project folder

Watch Video tutorial
Sunday, February 15, 2015
Internet Download Manager IDM 6 17 Build 10 full version with crack

Review:
Internet Download Manager (IDM) is a tool to increase download speeds by up to 5 times, resume and schedule downloads. Comprehensive error recovery and resume capability will restart broken or interrupted downloads due to lost connections, network problems, computer shutdowns, or unexpected power outages. Simple graphic user interface makes IDM user friendly and easy to use.Internet Download Manager has a smart download logic accelerator that features intelligent dynamic file segmentation and safe multipart downloading technology to accelerate your downloads. Unlike other download managers and accelerators Internet Download Manager segments downloaded files dynamically during download process and reuses available connections without additional connect and login stages to achieve best acceleration performance.
Internet Download Manager supports proxy servers, ftp and http protocols, firewalls, redirects, cookies, authorization, MP3 audio and MPEG video content processing. IDM integrates seamlessly into Microsoft Internet Explorer, Netscape, MSN Explorer, AOL, Opera, Mozilla, Mozilla Firefox, Mozilla Firebird, Avant Browser, MyIE2, and all other popular browsers to automatically handle your downloads. You can also drag and drop files, or use Internet Download Manager from command line. Internet Download Manager can dial your modem at the set time, download the files you want, then hang up or even shut down your computer when its done.
Other features include multilingual support, zip preview, download categories, scheduler pro, sounds on different events, HTTPS support, queue processor, html help and tutorial, enhanced virus protection on download completion, progressive downloading with quotas (useful for connections that use some kind of fair access policy or FAP like Direcway, Direct PC, Hughes, etc.), built-in download accelerator, and many others.
Version 6.17 adds Windows 8 compatibility, adds IDM download panel for web-players that can be used to download flash videos from sites like MySpaceTV, and others. It also features complete Windows 7 and Vista support, video page grabber, redeveloped scheduler, and MMS protocol support. The new version also adds improved integration for IE 10 and IE based browsers, redesigned and enhanced download engine, the unique advanced integration into all latest browsers, improved toolbar, and a wealth of other improvements and new features.
Screen Shots:


How to Create full version IDM 6.17: Video Tutorial
Download Internet Download Manager 6.17 Build 8
Password: 4hbest.blogspot.com
I hope you like it......!
Thursday, February 12, 2015
Bar chart with Target lines in pentaho CDE making bars as lines using java script in pentaho CDE
Hi guys,
This post teach you how to make bars as lines in pentaho CDE.
Source for this post is : http://jsfiddle.net/duarteleao/7maGD/
and http://type-exit.org/adventures-with-open-source-bi/2011/06/creating-dashboards-with-cde/
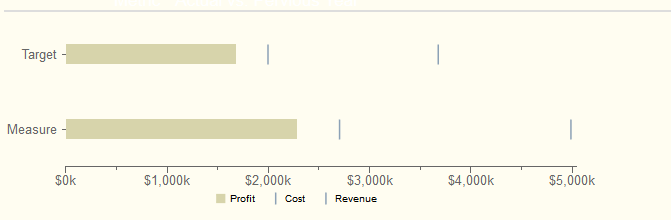
Scenario : Some end users wants visualization of grouped bars as lines where one of the bar is as bar and remaining bars as targeted lines on the same bar.
Properties have to give:
Plot2 : True
Find the remaining properties in below image: version of CDE is : 13.06 but will work in higher versions also.
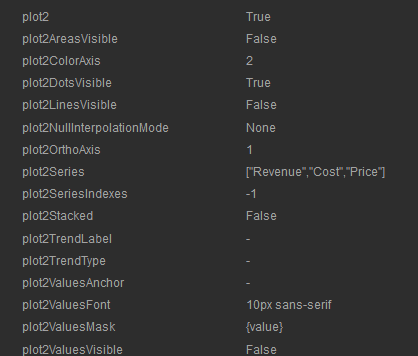
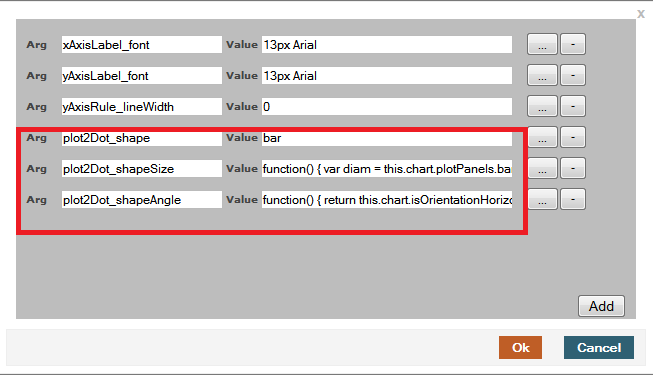
NOTE: Find the image for how to give the above code as properties in Extension points of chart component.
Sample output of the chart on dashboard after giving the above properties.
Sadakar
BI developer
("Learning never exhausts the mind")
This post teach you how to make bars as lines in pentaho CDE.
Source for this post is : http://jsfiddle.net/duarteleao/7maGD/
and http://type-exit.org/adventures-with-open-source-bi/2011/06/creating-dashboards-with-cde/
Scenario : Some end users wants visualization of grouped bars as lines where one of the bar is as bar and remaining bars as targeted lines on the same bar.
Properties have to give:
Plot2 : True
Find the remaining properties in below image: version of CDE is : 13.06 but will work in higher versions also.
In "Extension points" for the chart component you need to give 3 properties from the first link.
They are
extensionPoints: {
plot2Dot_shape: bar,
plot2Dot_shapeSize: function() {
var diam = this.chart.plotPanels.bar.barWidth ||
this.chart.options.barSizeMax;
return this.finished(diam);
},
plot2Dot_shapeAngle: function() {
return this.chart.isOrientationHorizontal() ? 0 : -Math.PI/2;
}
plot2Dot_shape: bar,
plot2Dot_shapeSize: function() {
var diam = this.chart.plotPanels.bar.barWidth ||
this.chart.options.barSizeMax;
return this.finished(diam);
},
plot2Dot_shapeAngle: function() {
return this.chart.isOrientationHorizontal() ? 0 : -Math.PI/2;
}
NOTE: Find the image for how to give the above code as properties in Extension points of chart component.
Sample output of the chart on dashboard after giving the above properties.
Sadakar
BI developer
("Learning never exhausts the mind")
Leawo PowerPoint to Video Pro 2 2 0 55 Full Version with serial key and patch
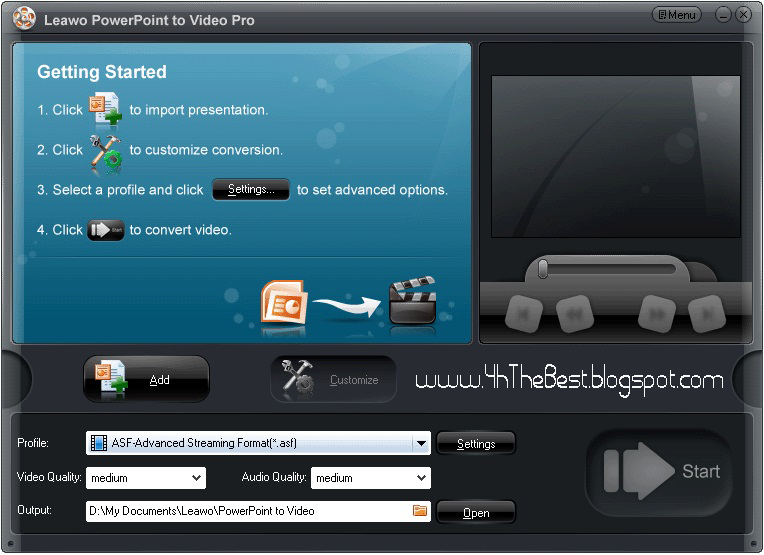
Convert PowerPoint to video in most formats. Leawo PowerPoint to Video Pro is a wonderful PowerPoint to video conversion program that assists in converting your PowerPoint presentations and slideshows to quality videos for uploading to video-sharing websites like YouTube and playing on portable devices like iPad, iPod and iPhone, while retaining all the animations, slide transitions, sounds and video clips in the source PowerPoint. #
The PPT to Video conversion tool offers an innovative way for you to deliver anything made in PowerPoint, from Math homework to Makeup ads, from courseware to church sermons, fast and faithfully to the recipients via a video-welcome site.
Convert PowerPoint to video of 23 formats
Transfer your PowerPoint to the video format you prefer. Create a variety of video slideshows, regular ones including ASF, AVI, FLV, MPEG, MP4, TS, MOV, WMV, VOB, 3GP, and rare ones like RM, RA, MKV, MKA, Wii AVI, Wii MOV, NDS DPG, NDS DPG2, NDS DPG3 and NDS DPG4. Extract a sound from PowerPoint and turn it to a different audio format, e.g. *.aac, *.ac3, *.mp3.
Support multiple PowerPoint versions as input
Convert PowerPoint 2010, 2007, 2003, 2002, 2000 files to almost all kinds of video formats. With the support for free PowerPoint Viewer 2010 and 2007, you are able to convert PowerPoint to video without Microsoft Office Suite installed on your computer. Good for Microsoft Office PowerPoint fans who want more video copies of their PowerPoint presentations.
Batch Conversion for PowerPoint files
Process multiple PPT files per conversion. The input file formats supported by this PowerPoint to video converter include PPT, PPS, POT, PPTX, PPSX, POTX, etc. Create a separate video for each input PPT file.
Convert PPT to video for multiple web services
Export a PowerPoint presentation to popular web video like Audio Video Interleaved, Flash Video, Windows Media video, Apple QuickTime Movie and more, making it accessible on YouTube, Google Video, your blogs and many other video-sharing sites.
Output video for diverse end-devices
Apart from specific video file format, this PowerPoint to video conversion tool also offers non-tech savvy users a comfort to choose a proper video output - to choose by terminal device of their PowerPoint video, which features Apple TV, Blackberry, iPod, iPad, iPhone, PSP, PS3 (HD support), Pocket PC, Zen, Zune, XBOX, and etc.
Multi-lingual User Interface for easier conversion
Leawo PowerPoint to Video Pro is set with a neat GUI in 7 most-spoken languages, i.e. French, German, Italian, Simplified and Traditional Chinese, to give you quick access to your video slideshow.
Keep everything from original PowerPoint to output video
Retain all original elements, particularly dynamic effects like music, flash, movie clips from a selected PowerPoint file to final video. You can modify the video settings in the Profile of the PPT to video converter and make your own.
Insert background music & record real-time narration
The Music feature of this cool PowerPoint to video converter allows you to add background music or your recorded narration for the video slideshow. You can insert as many soundtracks as you like. You can also add watermark or logos to credit your work. Adjust the video layout with photo frame you can create a perfect video out of ordinary PowerPoint.
Process fast and precisely with a timeline
Convert your all-ready PowerPoint presentations to videos in no minute. Display the exact process of each PPT file with precise conversion time. Preview the output video during the conversion process.

I hope you like it......!
Wednesday, February 11, 2015
Adobe Photoshop 7 0 full version with tutorial

Download Adobe Photoshop 7.0 for free , we are not taking any peny for download Adobe Photoshop 7.0 and Adobe Photoshop 7.0 is carefully checked i am guarantee that Adobe Photoshop 7.0 is free of virus Adobe Photoshop 7.0 is included in software category. you can download PC Tools Performance Toolkit 2 by clicking below button to start downloading Adobe Photoshop 7.0 and wait for downloading and after some minutes youll done !!! Dont forget to share PC Tools Performance Toolkit 2 with your friends ,Dont forget to share Adobe Photoshop 7.0 with your cousins, Dont forget to share Adobe Photoshop 7.0 with your class-mates,Dont forget to share Adobe Photoshop 7.0 with others
Download Adobe photoshop 7.0
Password: harryprince
How to use adobe Photoshop 7.0
Tuesday, February 10, 2015
Winzip pro 17 5 Full version with Serial key

Info:
Unzip all major formats - With just a click, open all major compression file types, including Zip, Zipx, RAR, 7Z, TAR, GZIP and more.
Protect your files - Easily encrypt files as you zip to keep information and data secure. Add watermarks to deter unauthorized copying.
Do more with your files - Convert Microsoft Office files to PDF and easily resize photos to more convenient sharing sizes as you zip.
Share anywhere - Connect to your cloud services, and share via social media and email while keeping your files secure.
FEATURES
Zip and manage content
Compressing large files and folders makes them easier to transfer and saves storage space. Choose files from your PC using simple, drag-and-drop functionality or get files you’ve stored on Box, SkyDrive, Dropbox or Google Drive to zip instantly. Zip files are perfect for sharing because they let you organize multiple files into one convenient package.
Unzip anything
Extract content from the industrys widest selection of compressed file types, including Zip, Zipx, RAR, 7Zip, BZ2, LHA/LZH and many more. When extracting encrypted files, WinZip auto-wipes all temporarily extracted copies to prevent misuse.
NEW! Share with the cloud
WinZip connects directly to Box, SkyDrive, Dropbox and Google Drive so you can organize all your cloud files at once. Use WinZip to zip and save large files to the cloud or retrieve files or links to share via email. Secure your files and save precious online storage space by zipping and encrypting them first.
NEW! Zip and share to social media
Use ZipShare to share any type of file to Facebook, Twitter and LinkedIn. Keep everyone in the loop by posting content to all three social networks at once. Simply select the files you want to share, compose your message, and pick the social networks where you want your files to go.
Email large files with ease
Use the integrated ZipSend file delivery service to send oversized files or entire folders using your own email. ZipSend automatically zips and uploads your files to the cloud, then adds a link to the files in your email message. Send up to 50MB per message for free or try ZipSend Pro to send up to 2GB.
NEW! Convert files to PDF
Share content the right way by converting to PDF. WinZip makes it easy to convert Microsoft Office files to PDF as you zip, making them ready to share with anyone. For extra protection, consider creating a read-only PDF.
NEW! Create share-ready images
Convert high-resolution images to more convenient sharing sizes instantly when adding them to your Zip. This lets you share entire albums with ease while keeping full-quality originals on file.
Preview files and folders
WinZips convenient previewing functionality lets you browse the contents of a Zip before deciding if you need to unzip it. The advanced Unzip and Try feature lets you temporarily review related components within a Zip (such as an HTML page and its associated graphics) without having to extract the Zip first.
Secure confidential information
Protect your files from unauthorized access by applying banking-level security with 128- or 256-bit AES encryption. For extra security, set your own password policy by defining complexity requirements that WinZip will enforce for you.
NEW! Add watermarks
Deter unauthorized copying, add traceability and protect your intellectual property by adding custom watermarks to images and PDFs. You control how and where the watermark appears.
Back up your files, automatically
Back up your documents, email, desktop, favorites, pictures, libraries and more with just a click by setting up custom jobs to automatically zip and archive your important files. Simplify the process and free yourself from repetitive zipping and archiving tasks by using predefined jobs.
Get more from portable media
Prevent data loss by zipping and backing up your important data and burning it directly to Blu-ray Disc, CD or DVD. You choose if you want to back up your whole computer or just specific files. If necessary, WinZip Pro will automatically split your backups over multiple disks.
System Requirements:
- Microsoft Windows 8
- Windows 7
- Windows Vista
- Windows XP
Screen Shots: Click on the image to view large screen
 |  |  |
I hope you like it......!
Thursday, February 5, 2015
New Checkbox reCAPTCHA Tutorial with Sample Code
Google has improved their reCAPTCHA to an user friendly one with a tag Im not a robot. Usually you need to enter the captcha characters all time, but this improved reCAPTCHA dont always need user to enter the characters.
Validation is done just by checking the input box, however if google suspects user as spam (by IP and users previously collected details) they will show a image or audio based challenge.
View Demo | Download
To begin you need SiteKey and SecretKey from reCAPTCHA website. Visit https://www.google.com/recaptcha and create above keys for your site free.
Login.html

validateform.php
Session Expiration in reCAPTCHA
After checking the reCAPTCHA box, if user stays the same page for 5 minutes, his reCAPTCHA session will be expired.
Then it will ask the user to verify himself by showing the AUDIO or IMAGE Challenge
You can configure which TYPE of challenge you want to show always. Replace the above Login.html file div class="g-recaptcha" code with below one.
Thats it.
Validation is done just by checking the input box, however if google suspects user as spam (by IP and users previously collected details) they will show a image or audio based challenge.
 |
| new reCAPTCHA |
To begin you need SiteKey and SecretKey from reCAPTCHA website. Visit https://www.google.com/recaptcha and create above keys for your site free.
Login.html
<!DOCTYPE html>
<html lang="en">
  <head>
    <meta charset="utf-8">
    <meta http-equiv="X-UA-Compatible" content="IE=edge">
    <meta name="viewport" content="width=device-width, initial-scale=1">
    <meta name="description" content="">
    <meta name="author" content="">

    <title>MyCodde.blogspot.com Login</title>

    <!-- Bootstrap core CSS -->
    <link href="http://getbootstrap.com/dist/css/bootstrap.min.css" rel="stylesheet">

    <!-- Custom styles for this template -->
    <link href="http://getbootstrap.com/examples/signin/signin.css" rel="stylesheet">


    <!-- HTML5 shim and Respond.js for IE8 support of HTML5 elements and media queries -->
    <!--[if lt IE 9]>
      <script src="https://oss.maxcdn.com/html5shiv/3.7.2/html5shiv.min.js"></script>
      <script src="https://oss.maxcdn.com/respond/1.4.2/respond.min.js"></script>
    <![endif]-->
  </head>

  <body>

    <div class="container">

      <form class="form-signin" role="form" action="validateform.php" method="POST">
            <div id="status">
            </div>
        <h2 class="form-signin-heading">Please sign in</h2>
        <label for="inputEmail" class="sr-only">Email address</label>
        <input type="email" id="inputEmail" value="mycodde@test.com" class="form-control" placeholder="Email address" required autofocus>
        <label for="inputPassword" class="sr-only">Password</label>
        <input type="password" id="inputPassword" value="rashid" class="form-control" placeholder="Password" required>
        <div class="g-recaptcha" data-sitekey="6Lc_0f4SAAAAAF9ZA_d7Dxi9qRbPMMNW-tLSvhe6"></div>
        <button class="btn btn-lg btn-primary btn-block" type="submit">Sign in</button>
      </form>

    </div> <!-- /container -->


    <!-- Bootstrap core JavaScript
    ================================================== -->
    <!-- Placed at the end of the document so the pages load faster -->
    <script src="https://ajax.googleapis.com/ajax/libs/jquery/1.11.1/jquery.min.js"></script>
    <script src="http://getbootstrap.com/dist/js/bootstrap.min.js"></script>
    <script src="https://www.google.com/recaptcha/api.js" async defer></script>
  </body>
</html>
validateform.php
<?php
//@author = mycodde.blogspot.com
require_once "recaptchalib.php";
// reCAPTCHA supported 40+ languages listed here: https://developers.google.com/recaptcha/docs/language
$lang = "en";
// The response from reCAPTCHA
$resp = null;
// The error code from reCAPTCHA, if any
$error = null;
$reCaptcha = new ReCaptcha("6Lc_0f4SAAAAAKWjlLCttM0stC4AB7NYU81006RW");
if ($_POST["g-recaptcha-response"]) {
    $resp = $reCaptcha->verifyResponse(
        $_SERVER["REMOTE_ADDR"],
        $_POST["g-recaptcha-response"]
    );
    //print_r($resp); To See the response object uncomment this
} else {
    echo "Recaptcha Not submitted";
}
if ($resp != null && $resp->success) {
    echo "Recaptcha Verification Success";
    //Write other FORM password and Email Validation Procedures
} else {
    echo "Recaptcha Verification Error";
}
?>
Session Expiration in reCAPTCHA
After checking the reCAPTCHA box, if user stays the same page for 5 minutes, his reCAPTCHA session will be expired.
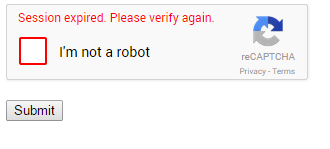 |
| reCAPTCHA Session Expired |
 |
| New reCAPTCHA showing audio challenge |
You can configure which TYPE of challenge you want to show always. Replace the above Login.html file div class="g-recaptcha" code with below one.
<div class="g-recaptcha"
data-sitekey="6Lc_0f4SAAAAAF9ZA_d7Dxi9qRbPMMNW-tLSvhe6" data-theme="dark" data-theme="dark" data-type="audio"></div>
 |
| reCAPTCHA Image Challenge after session expiration |
Create and Share PowerPoint presentations online with Docs
After Google presentations, authorSTREAM, Zoho Show, Slide Rocket and Slideshare, Docs is the new entrant in the list of online PowerPoint sharing platforms. Docs is the document sharing service from Microsoft Fuse Labs.
Docs not only lets you upload, but also the online creation of PowerPoint presentations. As the Docs is in beta phase so the PowerPoint creation has very limited set of tools and options. For now you cant add animations, sound or other formatting online. However, if you upload a PowerPoint presentation having animation effects, the converted online version retains all the animation effects which most of the online PowerPoint sharing platforms barring authorSTREAM fail to do. Only downside is that you need to have Silverlight browser plugin installed to view the animations. You just need a Facebook account to login and try out Docs.com. Docs.com is so closely integrated with Facebook that at most of the places it looks like a Facebook app instead of independent website.
Beta version of Docs.com lacks in sharing options and post to social network buttons except the one provided for sharing on Facebook. Non availability of embed code is also one of the drawbacks. Hopefully Microsoft will be adding these features soon.
Read more »
Docs not only lets you upload, but also the online creation of PowerPoint presentations. As the Docs is in beta phase so the PowerPoint creation has very limited set of tools and options. For now you cant add animations, sound or other formatting online. However, if you upload a PowerPoint presentation having animation effects, the converted online version retains all the animation effects which most of the online PowerPoint sharing platforms barring authorSTREAM fail to do. Only downside is that you need to have Silverlight browser plugin installed to view the animations. You just need a Facebook account to login and try out Docs.com. Docs.com is so closely integrated with Facebook that at most of the places it looks like a Facebook app instead of independent website.
Beta version of Docs.com lacks in sharing options and post to social network buttons except the one provided for sharing on Facebook. Non availability of embed code is also one of the drawbacks. Hopefully Microsoft will be adding these features soon.
Tuesday, February 3, 2015
Maxing out at 50 concurrent connections with Play or Netty on OS X Heres a fix
I recently ran across a strange problem with the Play Framework and Netty: on Linux, my Play app could easily handle thousands of concurrent connections; on OS X, the same app maxed out at around 50 concurrent connections. It took a while to figure out the problem, so in this post, Im documenting the solution in case other folks run into the same issue in the future. Note: if youre using raw Netty, the fix is very straightforward; if youre using Play, its much trickier, and I hope it will be fixed in Play itself in the near future.
tldr: set the backlog option on Nettys Bootstrap object to a higher value (example).
Symptoms
On OS X, your Play or Netty app cannot handle more than ~50 concurrent connections. A simple way to test this is to use Apache Bench:
As soon as you set the concurrency level (the -c parameter) above 50, youll get the error "apr_socket_recv: Connection reset by peer (54)". Moreover, your Play or Netty app will never actually see the request and nothing will show up in the logs.
However, if you run the same experiment against the same app running on Linux, even with the concurrency level set to several hundred or several thousand, all requests will complete successfully, without errors. Therefore, there must be something OS specific causing this problem.
To be fair, its rare to use OS X in any production or high traffic capacity - for example, at LinkedIn, we use OS X in dev, but Linux in prod - so the concurrency limitation is rarely a problem. However, we had a few use cases where, even in dev mode, we had to make many concurrent calls to the same app, so we had to find a solution.
The Cause
It turns out that "50" is the default size for the "backlog" parameter in Javas ServerSocket. It is even explained in the JavaDoc:
The Solution (pure Netty)
After some more digging, this StackOverflow thread reveals that the Netty ServerBootstrap class lets you set an option to override the backlog:
If youre using pure netty, just use the code above and the 50 concurrent connections limit will vanish immediately!
Also worth noting: this issue exists in Netty 3.x, but apparently Netty 4.x sets a better default than 50 on all OSs, so upgrading Netty versions may be another solution.
The Solution (Play)
Play instantiates the ServerBootstrap class inside of NettyServer.scala. Unfortunately, neither the class nor the boostrap instance inside of it are accessible to app code. This should be easy to fix via a pull request, but until that happens, and until a new version is available, here is a two part workaround to get moving.
Note: this is an ugly hack with lots of copy/paste from the original Play source code and is only meant as a temporary workaround. It has been tested with Play 2.2.1; figure out which version of Play youre on and be sure to use code from that release!
Step 1: make a local copy of NettyServer.scala called TempNettyServer.scala
Youll want to put TempNettyServer.scala in a different SBT project than your normal app code - that is, dont just put it in the app folder. See SBT Multi-Project Builds for more info.
The folder structure looks something like this: my-app is my original Play app and monkey-patch is a new SBT project for TempNettyServer.scala:
Copy the contents of the original NettyServer.scala into TempNettyServer.scala, with two changes:
Now, configure this new SBT project in project/Build.scala:
Step 2: override the run and start commands to use TempNettyServer
Ready for more copy/paste?
Grab PlayRun.scala and copy it into the project folder under some other name, such as TempPlayRun.scala and make two changes:
A note on OS limits
After making the changes above, you should be able to handle more than 50 concurrent connections. However, depending on how your OS is configured, you might still hit a limit at 128 or so. This is probably due to the kernel config kern.ipc.somaxconn, which controls "the size of the listen queue for accepting new TCP connections" and has a default of 128.
To tweak this limit, you can run the following command:
Your Netty or Play app should now be able to handle over 1000 concurrent connections (or more, depending on what limits you set above).
Read more »
tldr: set the backlog option on Nettys Bootstrap object to a higher value (example).
Symptoms
On OS X, your Play or Netty app cannot handle more than ~50 concurrent connections. A simple way to test this is to use Apache Bench:
As soon as you set the concurrency level (the -c parameter) above 50, youll get the error "apr_socket_recv: Connection reset by peer (54)". Moreover, your Play or Netty app will never actually see the request and nothing will show up in the logs.
However, if you run the same experiment against the same app running on Linux, even with the concurrency level set to several hundred or several thousand, all requests will complete successfully, without errors. Therefore, there must be something OS specific causing this problem.
To be fair, its rare to use OS X in any production or high traffic capacity - for example, at LinkedIn, we use OS X in dev, but Linux in prod - so the concurrency limitation is rarely a problem. However, we had a few use cases where, even in dev mode, we had to make many concurrent calls to the same app, so we had to find a solution.
The Cause
It turns out that "50" is the default size for the "backlog" parameter in Javas ServerSocket. It is even explained in the JavaDoc:
The maximum queue length for incoming connection indications (a request to connect) is set to 50. If a connection indication arrives when the queue is full, the connection is refused.Therefore, whatever code manages sockets in Netty must use different configurations for the backlog parameter on Linux and OS X. This code is likely tied to the selector implementation for the OS: Im guessing the Linux version uses epoll, while OS X uses kqueue. The former probably sets backlog to some reasonable value (perhaps from OS settings) while the latter just uses the default (which is 50).
The Solution (pure Netty)
After some more digging, this StackOverflow thread reveals that the Netty ServerBootstrap class lets you set an option to override the backlog:
If youre using pure netty, just use the code above and the 50 concurrent connections limit will vanish immediately!
Also worth noting: this issue exists in Netty 3.x, but apparently Netty 4.x sets a better default than 50 on all OSs, so upgrading Netty versions may be another solution.
The Solution (Play)
Play instantiates the ServerBootstrap class inside of NettyServer.scala. Unfortunately, neither the class nor the boostrap instance inside of it are accessible to app code. This should be easy to fix via a pull request, but until that happens, and until a new version is available, here is a two part workaround to get moving.
Note: this is an ugly hack with lots of copy/paste from the original Play source code and is only meant as a temporary workaround. It has been tested with Play 2.2.1; figure out which version of Play youre on and be sure to use code from that release!
Step 1: make a local copy of NettyServer.scala called TempNettyServer.scala
Youll want to put TempNettyServer.scala in a different SBT project than your normal app code - that is, dont just put it in the app folder. See SBT Multi-Project Builds for more info.
The folder structure looks something like this: my-app is my original Play app and monkey-patch is a new SBT project for TempNettyServer.scala:
Copy the contents of the original NettyServer.scala into TempNettyServer.scala, with two changes:
- Replace all NettyServer references to TempNettyServer
- In the newBootstrap method, make the change below to allow configuring the backlog option
Now, configure this new SBT project in project/Build.scala:
Step 2: override the run and start commands to use TempNettyServer
Ready for more copy/paste?
Grab PlayRun.scala and copy it into the project folder under some other name, such as TempPlayRun.scala and make two changes:
- Replace all PlayRun references with TempPlayRun: there should only be one, which is the class name.
- Replace all NettyServer references with TempNettyServer: there should two, both in String literals, used in the "run" and "start" commands to fire up the app.
A note on OS limits
After making the changes above, you should be able to handle more than 50 concurrent connections. However, depending on how your OS is configured, you might still hit a limit at 128 or so. This is probably due to the kernel config kern.ipc.somaxconn, which controls "the size of the listen queue for accepting new TCP connections" and has a default of 128.
To tweak this limit, you can run the following command:
Your Netty or Play app should now be able to handle over 1000 concurrent connections (or more, depending on what limits you set above).
Basic Android application with Google maps v2 API
In this post I will illustrate how to make settings for Google maps v2 API in Android Manifest.
1. Create an Android project.
 2. We need to make some changes Android Manifest.xml


4. The next step is to add the lib project into the our newly created projects references.


5. As the final step we have to add the fragment for the map in to xml layout.
Now you can run the project. If you are running this on Android emulator you have to do certain installations on AVD I will describe that in my next post.

Read more »
1. Create an Android project.
- Use API level 11 or above for minimum required SDK.
- Give the same package name which you gave when you are obtaining the API key from Google.
- Keep other settings as default
- Open the Manifest.xml and add following permissions as a child of the <manifest> element
- Google Maps Android API uses OpenGL ES version 2 to render the map there for we need to define the feature in Manifest file. Add following lines as a child of the <manifest> element.
- Add the API key by adding following lines as a child of the <application> element, inserting it just before the closing tag </application>
- Change the android:value="AIzaSyARrx5gAxtNJCHUBvwyIz4uZEFAm3R60kI" with the API key given by Google
- Finally your Manifest.xml should be like this.
3. To use Google maps in our Android project we have to add Google play services lib project.
- First check whether Google Play services are installed.
- To do that open Android SDK manager expand the Extras.
- Check the status of Google Play Services is installed if it is not installed you have to install it first.
- Then to import the Google play services lib project in to the work space, in Eclipse select
File >> Import >> Android >> Existing Android Code Into Workspace
- Click Next and select the Root Directory, browse to the google-play-services_lib. In my case it is in C:Androidadt-bundle-windows-x86-20130219sdkextrasgooglegoogle_play_serviceslibprojectgoogle-play-services_lib
- Most of the time you can find it under the sdkextrasgooglegoogle_play_serviceslibproject directory.
- Select the Copy project into workspace and click Finish.
4. The next step is to add the lib project into the our newly created projects references.
- Right click on the project select Properties >> Android and then click on Add button under Library
- In the project selection window select google-play-services_lib project and then click OK

- Then under the libraries there should be the google-play-services_lib project with a green tick.
5. As the final step we have to add the fragment for the map in to xml layout.
- Open the res >> layout and activity xml lay out file and copy following code to create the fragment.
- For this simplest example dont need to do any change for the Activities java file, keep it as it is.
import android.os.Bundle;
import android.app.Activity;
import android.view.Menu;

public class MainActivity extends Activity {

 @Override
 protected void onCreate(Bundle savedInstanceState) {
  super.onCreate(savedInstanceState);
  setContentView(R.layout.activity_main);
 }

 @Override
 public boolean onCreateOptionsMenu(Menu menu) {
  // Inflate the menu; this adds items to the action bar if it is present.
  getMenuInflater().inflate(R.menu.main, menu);
  return true;
 }
}
Now you can run the project. If you are running this on Android emulator you have to do certain installations on AVD I will describe that in my next post.
Subscribe to:
Posts (Atom)