Showing posts with label create. Show all posts
Showing posts with label create. Show all posts
Sunday, February 15, 2015
How to create MySQL Database and User name

What is MySQL:
MySQL is an open source database management software that helps users store, organize, and later retrieve data. It has a variety of options to grant specific users nuanced permissions within the tables and databases, May this tutorial gives you some kind of thinking about MySQL........!So now we lets start
How to Create MySQL Database and User:
Step 1: Login to your Web hosting account and open your control panel ( Cpanel ).
Step 2: Find Databases portion look like this: for example
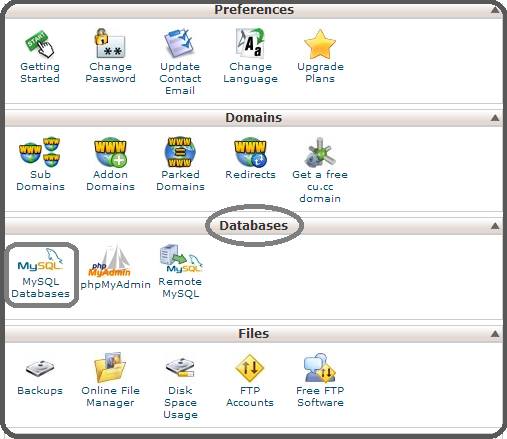
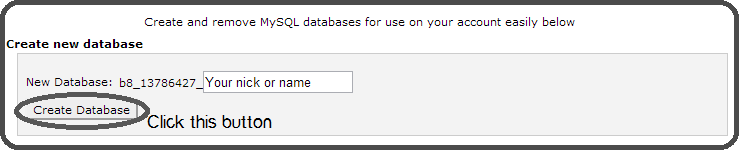
Step 3: Now click on MySQL Database and this screen will appeared look like given below image: Write your name or nick name as you want in New Database black box and click on Create Database.
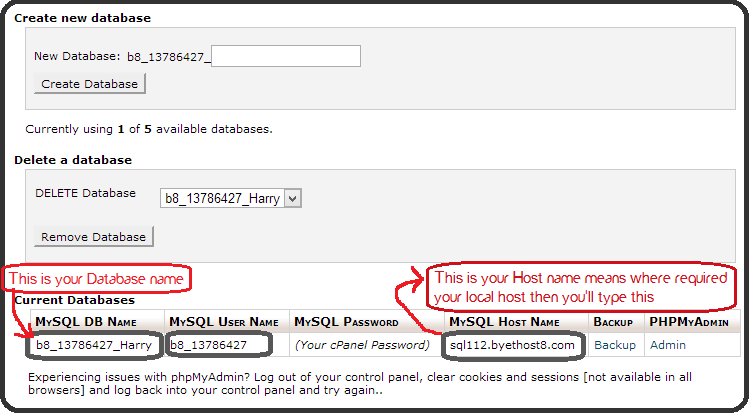
After click on Create Database button then you will see the given below screen. In the MySQL DB name means Your Database name and in the MySQL Host name means where you are required to enter your local host then you will type this ( your MySQL Host Name).
Congratulation you have done it.For more detail How to Install WordPress

Thursday, February 12, 2015
C Program to Create a Binary Tree Using Recursion Linked Representation
![C Program to Create a Binary Tree Using Recursion [Linked Representation]](https://blogger.googleusercontent.com/img/b/R29vZ2xl/AVvXsEjGLSWZDnJJqjV1qzz7_8HUKMvd34NcekdXEWE_BnrB0EMwmONwXoXSjPaKUtk9c-TNQVA2JKbUuuHOR3SYWjH2WuDnW8onVX6Ksqu12JCsexSiUQFlAuINHo2sSs4vos0ueU0mhKloA8el/s640/C+Program+to+Create+a+Binary+Tree+Using+Recursion+%255BLinked+Representation%255D+1.jpg "C Program to Create a Binary Tree Using Recursion [Linked Representation]")
What is Binary Tree?
A tree is said to be a binary tree if each node of the tree can have maximum of two children. Children of a node of binary tree are ordered. One child is called “left” child and the other is called “right” child. An example of binary tree is shown in below diagram.
![C Program to Create a Binary Tree Using Recursion [Linked Representation]](https://blogger.googleusercontent.com/img/b/R29vZ2xl/AVvXsEg-DMCVlJV8IlvtlvjHSAwFhxej9vLkzzlEGb1yzy0OJOK2ergbYUjFoowFlRFTr-7vsm5qjFMAGhuxIeOR3e2IHJ1WXWFlB66yTgPgt0xXW16ayJ9OLt-I0raOO8bPiAG14hIF0XQWXdHN/s640/C+Program+to+Create+a+Binary+Tree+Using+Recursion+%5BLinked+Representation%5D+2.jpg "C Program to Create a Binary Tree Using Recursion [Linked Representation]")
Creation of Binary Tree Using Recursion
A binary tree can be created recursively. The program will work as follow:
1. Read a data in x.
2. Allocate memory for a new node and store the address in pointer p.
3. Store the data x in the node p.
4. Recursively create the left subtree of p and make it the left child of p.
5. Recursively create the right subtree of p and make it the right child of p.
Also Read: C++ program to create Facebook Login screen
Also Read: C++ Program For Linked List Representation Of Linear Queue
The program is written in C language which allows linked representation of binary tree. Code will be as follow:
#include<stdio.h>
typedef struct node
{
int data;
struct node *left;
struct node *right;
}node;
node *create()
{
node *p;
int x;
printf("Enter data(-1 for no data):");
scanf("%d",&x);
if(x==-1)
return NULL;
p=(node*)malloc(sizeof(node));
p->data=x;
printf("Enter left child of %d:
",x);
",x);
p->left=create();
printf("Enter right child of %d:
",x);
",x);
p->right=create();
return p;
}
void preorder(node *t) //address of root node is passed in t
{
if(t!=NULL)
{
printf("
%d",t->data); //visit the root
%d",t->data); //visit the root
preorder(t->left); //preorder traversal on left subtree
preorder(t->right); //preorder traversal om right subtree
}
}
int main()
{
node *root;
root=create();
printf("
The preorder traversal of tree is:
");
The preorder traversal of tree is:
");
preorder(root);
return 0;
}
In the above program I have used preorder traversal to just show that the tree is created properly or not. You can use any other traversal method here.
Tuesday, February 10, 2015
Top 5 Tools to Create Interesting Infographic

Infographics are big image files that disseminate information of some sort. That is the modern definition of an Infographic, even though technically a modern online infographic is just a mere “type” of Infographic. Still, the image file Infographics you see online are popular because they have an SEO (Search Engine Optimization) value and they are attractive for readers to look at. There is no science to creating a modern Infographic, nor are there any sorts of rules. Here are five tools you can use to create your very own Infographics.
Also Read: Whats New With Windows 8.1? Release Date and Features
Also Read: Download WhatsApp for any Java Phone for free [100% Working]
1. InFoto
This is a free tool that you can use to create Infographics that are centered on how you take your photographs. A lot of people enjoy taking photos on their mobile devices, and some people have files full of images that nobody is ever going to see again. This tool helps those people to make use of their old photos, and it helps professional Infographic creators to create more original Infographics.
The Infographics tool will mine data from your photograph and then help you create an Infographic based upon that information. It is very easy to use as it does most of the work for you. It is free but you do have to suffer through adverts. You should give it a try if you are running out of ideas for your new batch of Infographics.
2. Vizualize
This is a tool that has lots of functions for people who want to make an Infographic about themselves. It has lots of functions that would be ideal for creating an Infographic CV, but they can be used for different purposes such as explaining how long you have had a certain client, or the achievements of your website or company.
The nice thing about this tool is that you can look at how other people have used the tool to create their Infographics, and then use the tool to copy what they did. You can then alter and customize your Infographic so that it does not look as if you have taken inspiration from another person. It is a good tool to use in conjunction with other tools.
3. Google Developers
This is a tool that allows you to connect with Google and collect data in real time so that you can add it to your Infographics. It gives you a wide choice of charts that you can use, and they all contain information that it available on Google. You can change and configure the charts so that they are more in keeping with the style of your Infographics or even of your website.
Also Read: The Top 4 Websites to Create Android Apps Online for Free
Also Read: The Top 8 Best Alternatives to Google Play Store to Download Android Apps for Free
Lots of people use this tool for their website to make their website appear a little less like the work of a bumpkin, and make it look a little more professional. You can apply the same rules to your Infographics and make them look more professional with the charts you gain from the Google developers’ tool.
4. Piktochart
This is the software that you see on most lists of this nature. It allows you to create charts with their tools and you can customize them so that they do not look like the charts everybody else has created with this tool. You can add in a lot of alterative graphics you can use with the tool, you can customize the font and change the color scheme to match your Infographics.
The tool is free to use, but you can upgrade your version to a more advanced one if you are planning on making multiple different Infographics. The templates you use are lined, so you can set things out on your Infographic page without worrying about them being wonky or misaligned. You can also resize things and keep them in proportion as you do it.
5. Easel.ly
This tool has lots of different Infographics templates that you can use to create your Infographics. It is sometimes difficult to try and come up with a brand new Infographic out of thin air. Sometimes you need a little something to get your started, and that is where this tool may help you. The templates are fairly simple and are all customizable so you do not have to create Infographics that look like everybody else’s.
It also has different tools and editorial functions that you can use, such as connector lines and shapes. You can also adjust your text styles and sizes. You can adjust your Infographics colors and upload your own graphics whilst adjusting your Infographic fonts.
Author’s bio:
My name is Sonia Jackson. I write for www.cool-essays.comthat provides well-written and quality essays and research papers for college and university students.
Thursday, February 5, 2015
Create and Share PowerPoint presentations online with Docs
After Google presentations, authorSTREAM, Zoho Show, Slide Rocket and Slideshare, Docs is the new entrant in the list of online PowerPoint sharing platforms. Docs is the document sharing service from Microsoft Fuse Labs.
Docs not only lets you upload, but also the online creation of PowerPoint presentations. As the Docs is in beta phase so the PowerPoint creation has very limited set of tools and options. For now you cant add animations, sound or other formatting online. However, if you upload a PowerPoint presentation having animation effects, the converted online version retains all the animation effects which most of the online PowerPoint sharing platforms barring authorSTREAM fail to do. Only downside is that you need to have Silverlight browser plugin installed to view the animations. You just need a Facebook account to login and try out Docs.com. Docs.com is so closely integrated with Facebook that at most of the places it looks like a Facebook app instead of independent website.
Beta version of Docs.com lacks in sharing options and post to social network buttons except the one provided for sharing on Facebook. Non availability of embed code is also one of the drawbacks. Hopefully Microsoft will be adding these features soon.
Read more »
Docs not only lets you upload, but also the online creation of PowerPoint presentations. As the Docs is in beta phase so the PowerPoint creation has very limited set of tools and options. For now you cant add animations, sound or other formatting online. However, if you upload a PowerPoint presentation having animation effects, the converted online version retains all the animation effects which most of the online PowerPoint sharing platforms barring authorSTREAM fail to do. Only downside is that you need to have Silverlight browser plugin installed to view the animations. You just need a Facebook account to login and try out Docs.com. Docs.com is so closely integrated with Facebook that at most of the places it looks like a Facebook app instead of independent website.
Beta version of Docs.com lacks in sharing options and post to social network buttons except the one provided for sharing on Facebook. Non availability of embed code is also one of the drawbacks. Hopefully Microsoft will be adding these features soon.
Subscribe to:
Posts (Atom)