Showing posts with label using. Show all posts
Showing posts with label using. Show all posts
Tuesday, February 17, 2015
How To Remote Computer Using IP address
 |
| How To Remote Computer Using IP address |
Literally, hacking is accessing something or somebody in internet without their permission or interest. While, speaking in summary, hacking is very easy job, it is like instead of using front door, finding the hidden door of a house and hijacking the precious things. Among all the hacking, hacking via IP address is one of the most common yet powerful beginning.
Mesothelioma Lawyers San Diego
You may want to hack the website and put your advertisement there or grab some database information In this type of hacking, you are playing with the web server’s computer instead of the administrator’s computer. Because, www.website.com is hosted in separate web server rather than personal computer.
Another can be accessing your friend’s computer from your home. Again this is IP based and this is possible only when your friend’s computer is online. If it is off or not connected to internet then remote IP hacking is totally impossible.
Well, both of the hacking has the same process. Let’s summarize what we must do.
Secured Loan Calculator
Confirm the website or a computer you want to hack.
Find or trace their IP address.
Make sure that IP address is online
Scan for open ports
Check for venerable ports
access through the port
Brute-force username and password
Now let me describe in brief in merely basic steps that a child can understand it.
First, getting the IP address of victim.
To get the IP address of the victim website, ping for it in command prompt.
For example,
ping www.google.com
will fetch the IP address of Google.com
a How to hack remote computer using IP Address
This is how we can get the IP address of the victims website.
How about your friend’s PC? You can’t do www.yourfirend’sname.com, can you? Finding your friend’s IP address is little tough job, and tougher it is if he has dynamic IP address that keeps changing.
One of the widely used method to detect IP address of your friend is by chatting with him.
You might find this article helpful
How to get the IP address using MSN/Yahoo/Pidgin messenger
Now you got the IP address right? Is it online?
To know the online status just ping the IP address, if it is online it will reply.
If the IP address is online, scan for the open ports. Open ports are like closed door without locks, you can go inside and outside easily.
Use Advanced Port Scanner to scan all open and venerable ports.
b How to hack remote computer using IP Address
Now you’ve IP address and open port address of the victim, you can now use telnet to try to access them. Make sure that you’ve telnet enabled in your computer or install it from Control panel > Add remove programs > add windows components.
Now open command prompt and use telnet command to access to the IP address. Use following syntax for connection.
telnet [IP address] [Port]
c How to hack remote computer using IP Address
You’ll be asked to input login information.
d How to hack remote computer using IP Address
If you can guess the informations easily then it’s OK. Or you can use some brute-forcing tools like this one.
In this way you’ll able to hack remove computer using only IP address
Purchase Structured Settlements

Monday, February 16, 2015
Using a VPN Service – How to Hide Yourself Online

Many Internet surfers want to remain hidden or just left alone. Their reasoning might be founded on something more than just doing something illicit, or illegal. Their reasoning might be based on not wanting to be a part of the ongoing online marketing strategies that scrub personal habits away from everything we do on the Internet. Many companies are eager to get their hands on any Internet surfer’s searching habits, buying and selling preferences, and even their economic status. Most of these companies use this technology to build profiles from the information they garner to know exactly what the online surfer is interested in purchasing before they ever start looking.
Creating Anonymity
The easiest way to hide personal buying habits and other individualized data is to create an anonymous connection online, through a VPN (virtual private network). Using a VPN, the online surfer’s browser will not be recognized by intrusive eyes attempting to pry into personal information and habits. A VPN service creates anonymity by reassigning the computer’s true IP address in an exchange for an anonymous one. This will instantly create a barrier that hides the Internet surfer’s actual data including their region, name and physical address, along with the ISP (Internet service provider) that is being used.
Also Read: Tips on How to Have Better SEO Results with Link Building
A VPN service works as an intermediary between the user and the remote location or website. All requests generated from the user, or the visited website, must go through the virtual private network server. This avoids any man-in-the-middle attackers or cyber-thieves attempting to invade the Internet surfer’s privacy.
Open Access
Using a reputable VPN service provides the Internet surfer open access to any website online. They can gain instant access to social media networks, blogging sites, and streaming websites. These include Netflix, Hulu, Pandora and others that are often restricted due to high activity bandwidth. Additionally, they can visit gambling sites that have heavy restrictions between countries, and allow them to have full access.
Gaining the ability to surf online, without having any online connection session monitored or blocked, is the simplest way to hide online. A reputable VPN service can provide a continuous secured environment that is anonymous to anyone attempting to intercept personal information and data, from any location around the globe. In some countries, government rules and regulations allow law enforcement to request logs and information anytime they suspect an illegal activity from the anonymous surfer.
Veronica Clyde reviews the best VPN providers at VPNServices.net. She loves to share Online Security, VPN technology and Blogging tips. If interested you can check out a Hide my ass.com review.
Sunday, February 15, 2015
USING YOUR BLUETOOTH ENABLED PHONE AS A MODEM UBUNTU 10 4 LTS
 |
| Using your phone as a modem via Bluetooth |
Author: Kibui Kenneth Maina Wed Sep 1, 4:43PM
CLICK ON AN IMAGE TO VIEW THE FULL SIZE IF ITS TOO BURY
1. Go to http://ubuntu-tweak.com/ and install Ubuntu tweak. (It makes it easy for novices and experienced users to configure and manage Ubuntu).
2. After the installation completes go to Applications>System tools> Ubuntu tweak
 |
| Installed Ubuntu tweak |
4. Check Blueman if it is not already checked and click apply. (install to completion)
5. Turn on your phone and computers Bluetooth. (I am Using the Motorolla l6i for this demo).
 |
| Motorola L6i |
6. Go to System>Preferences>Bluetooth Manager
7. Click on the search button on the Bluetooth manager. All available Bluetooth devices will be detected and displayed.
 |
| Installed Bluetooth manager |
8. Click once on your phone on the Bluetooth manager to select it then go to setup on the top bar of the Bluetooth manager.
 |
| A Paring session |
9. Select custom passkey and key in the code of your choice or use mine 0000 then click forward.
 |
| Putting a passkey |
10. Your phone will ask you if you want to pair, select Yes, it will then ask you for a passkey, enter the passkey that you entered into the computer.
11. You will then be asked if you want to connect to dial up networking click forward, select the network that you are on and click on forward.
 |
| Setting up your broadband connection |
12. You will be informed that your device has been added and connected successfully click close.
 |
| Finalizing the set up process |
13.Your Blue tooth manager should appear as follows.
 |
| Your phone connected as a modem |
14. Your panel will appear as follows (no wireless or wired network, one lighting Bluetooth icon one normal Bluetooth icon.
 |
| Your panel before connecting to mobile broadband |
15. Click on your network icon. Go to Mobile broadband and select your network
 |
| Connecting to mobile broadband Internet on your computer |
16. Your connection will appear as shown, with phone network bars appearing where your network connection is supposed to be.
 |
| Your connected mobile broadband ready to go |
|
| A mobile broadband connection on your computer |
17. Open your browser and browse away.... (Make sure you have enough credit), for Safaricom users you can convert your airtime to bundles to save on credit by dialing;
- *100#
- select option 1
- select option 2
- select option 2
- Select the appropriate bundles
Migrating data from Oracle database to Postgresql database using Pentaho Kettle
This post will talk about migrating data from Oracle database to Postgresql database.
The same can be doable from one database to another database.(i.e., for example MS-SQL server to postgreSQL).
Pentaho has its in built wizard tools to Migrate data from one database to another another database.
Find the below steps how we can use this in-buit tool in migrating.
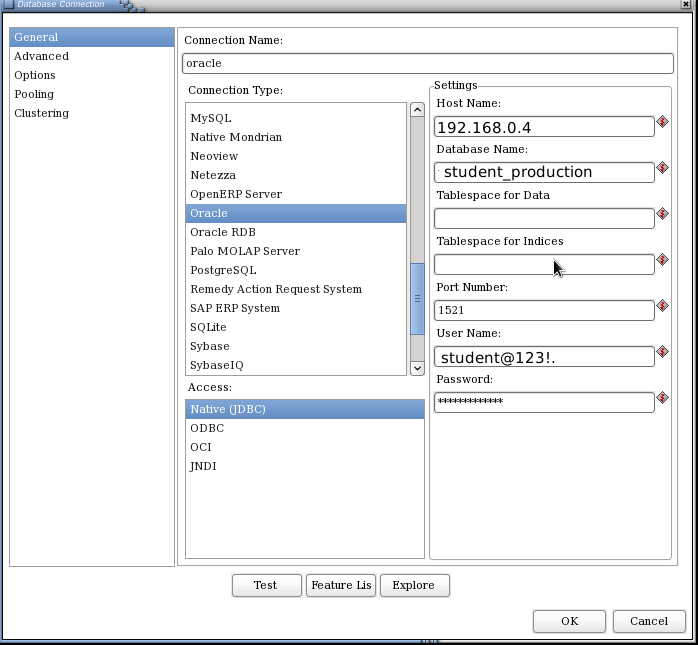
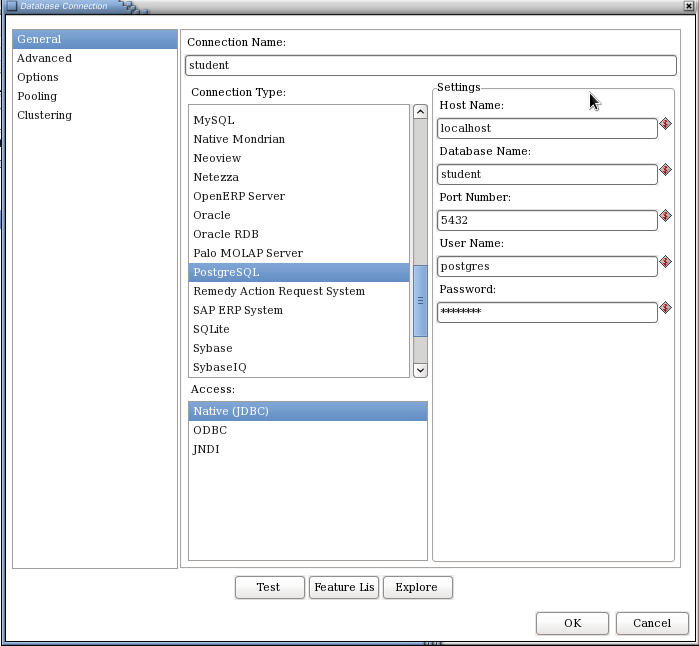
1) Create source database connection and target database connection.
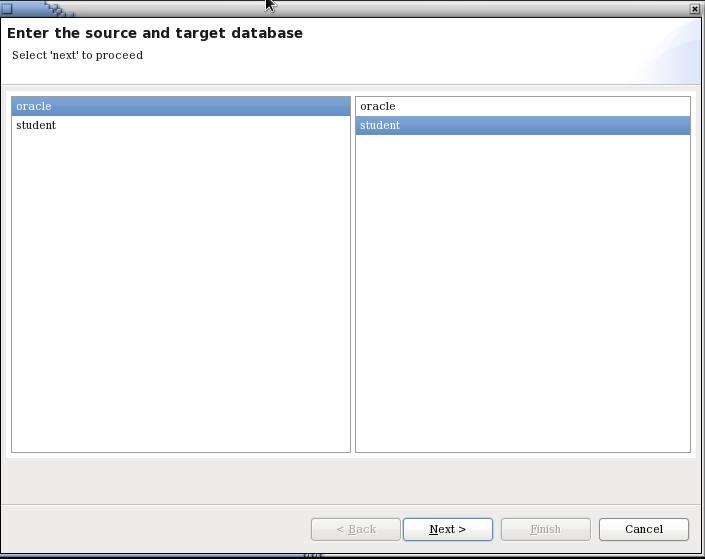
i.e., for example oralce connection as source and postgresql connection as target.
Go to Tools -> Wizard -> Create database connection.
Repeat the same for postgresql connection.
2) Go to Tools -> Wizard ->Copy Tables . Find the below images.
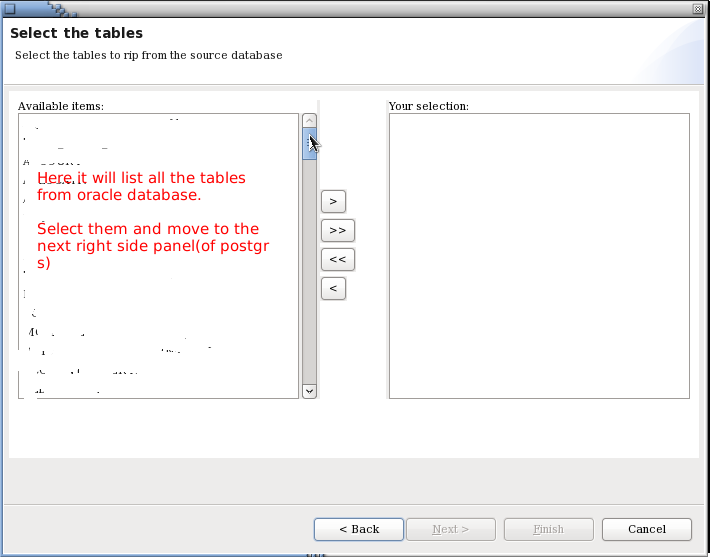
3) Itll create a job and “N” number of transformations based upon the number of tables in oracle database.
4) Run your job.. Thats all we have done.
Check the description & content of the tables in postgres.
References :
https://wiki.postgresql.org/wiki/Migrating_from_one_database_to_another_with_Pentaho_ETL
http://wiki.pentaho.com/display/COM/Using+the+Copy+Table+Wizard
http://wiki.pentaho.com/display/COM/Using+the+Copy+Table+Wizard
Saturday, February 14, 2015
C Program for Implementation of Circular Queue Using Array
#include<stdio.h>
#define MAX 10
typedef struct Q
{
int R,F;
int data[MAX];
}Q;
void initialise(Q *P);
int empty(Q *P);
int full(Q *P);
void enqueue(Q *P,int x);
int dequeue(Q *P);
void print(Q *P);
void main()
{
Q q;
int op,x;
initialise(&q);
do
{
printf("
1)Insert
2)Delete
3)Print
4)Quit");
printf("
Enter Your Choice:");
scanf("%d",&op);
switch(op)
{
case 1: printf("
Enter a value:");
scanf("%d",&x);
if(!full(&q))
enqueue(&q,x);
else
printf("
Queue is full !!!!");
break;
case 2: if(!empty(&q))
{
x=dequeue(&q);
printf("Deleted Data=%d",x);
}
else
printf("
Queue is empty !!!!");
break;
case 3: print(&q);break;
}
}while(op!=4);
}
void initialise(Q *P)
{
P->R=-1;
P->F=-1;
}
int empty(Q *P)
{
if(P->R==-1)
return(1);
return(0);
}
int full(Q *P)
{
if((P->R+1)%MAX==P->F)
return(1);
return(0);
}
void enqueue(Q *P,int x)
{
if(P->R==-1)
{
P->R=P->F=0;
P->data[P->R]=x;
}
else
{
P->R=(P->R+1)%MAX;
P->data[P->R]=x;
}
}
int dequeue(Q *P)
{
int x;
x=P->data[P->F];
if(P->R==P->F)
{
P->R=-1;
P->F=-1;
}
else
P->F=(P->F+1)%MAX;
return(x);
}
void print(Q *P)
{
int i;
if(!empty(P))
{
printf("
");
for(i=P->F;i!=P->R;i=(i+1)%MAX)
printf("%d ",P->data[i]);
printf("%d ",P->data[i]);
}
}

#define MAX 10
typedef struct Q
{
int R,F;
int data[MAX];
}Q;
void initialise(Q *P);
int empty(Q *P);
int full(Q *P);
void enqueue(Q *P,int x);
int dequeue(Q *P);
void print(Q *P);
void main()
{
Q q;
int op,x;
initialise(&q);
do
{
printf("
1)Insert
2)Delete
3)Print
4)Quit");
printf("
Enter Your Choice:");
scanf("%d",&op);
switch(op)
{
case 1: printf("
Enter a value:");
scanf("%d",&x);
if(!full(&q))
enqueue(&q,x);
else
printf("
Queue is full !!!!");
break;
case 2: if(!empty(&q))
{
x=dequeue(&q);
printf("Deleted Data=%d",x);
}
else
printf("
Queue is empty !!!!");
break;
case 3: print(&q);break;
}
}while(op!=4);
}
void initialise(Q *P)
{
P->R=-1;
P->F=-1;
}
int empty(Q *P)
{
if(P->R==-1)
return(1);
return(0);
}
int full(Q *P)
{
if((P->R+1)%MAX==P->F)
return(1);
return(0);
}
void enqueue(Q *P,int x)
{
if(P->R==-1)
{
P->R=P->F=0;
P->data[P->R]=x;
}
else
{
P->R=(P->R+1)%MAX;
P->data[P->R]=x;
}
}
int dequeue(Q *P)
{
int x;
x=P->data[P->F];
if(P->R==P->F)
{
P->R=-1;
P->F=-1;
}
else
P->F=(P->F+1)%MAX;
return(x);
}
void print(Q *P)
{
int i;
if(!empty(P))
{
printf("
");
for(i=P->F;i!=P->R;i=(i+1)%MAX)
printf("%d ",P->data[i]);
printf("%d ",P->data[i]);
}
}
Friday, February 13, 2015
HowTo Play sounds in ActivePerl using Win32 Sounds
Playing of sounds using Win32::Sound requires that you play the sound while the perl script is still running.
If the perl script terminates, the playing of sound also terminates.
The sound plays in this example because we are inside the Gtk2 main loop, the script does not terminate instantly because we are waiting for user inputs.
Please take note of the difference between the 2 buttons, SND_ASYNC allows the Gtk2 to loop without waiting for the sound to finish playing.
On the other hand, the one without the SND_ASYNC does not allow the Gtk2 loop to proceed until the sound has finished playing.
#!/usr/bin/perl -w
If the perl script terminates, the playing of sound also terminates.
The sound plays in this example because we are inside the Gtk2 main loop, the script does not terminate instantly because we are waiting for user inputs.
Please take note of the difference between the 2 buttons, SND_ASYNC allows the Gtk2 to loop without waiting for the sound to finish playing.
On the other hand, the one without the SND_ASYNC does not allow the Gtk2 loop to proceed until the sound has finished playing.
#!/usr/bin/perl -w
use strict;
use Gtk2 -init;
use Win32::Sound;
my $window = Gtk2::Window->new();
$window->signal_connect(destroy=>sub{ Gtk2->main_quit();});
my $vbox = Gtk2::VBox->new();
$window->add($vbox);
my $b1 = Gtk2::Button->new("NON BLOCKING");
$b1->signal_connect(clicked=>sub{
Win32::Sound::Play(SystemExclamation,SND_ASYNC);
# Win32::Sound::Play(c:\foobaring.wav,SND_ASYNC);
# you can also use the code above to play your own wav files
});
$vbox->pack_start($b1,0,0,0);
my $b2 = Gtk2::Button->new("BLOCKING");
$b2->signal_connect(clicked=>sub{
Win32::Sound::Play(SystemExclamation);
# Win32::Sound::Play(c:\foobaring.wav);
# you can also use the code above to play your own wav files
});
$vbox->pack_start($b2,0,0,0);
$window->show_all();
Gtk2->main();
Thursday, February 12, 2015
Fetch selected columns from SQL query on Table Component using Penaho CDE
Hi....
A requirement made me to write this post which will talk about fetching few columns on the table component from SQL query.....
Requirement :
Get 5 columns using query in CDA but fetch only 4 columns on the table component...
Fetch columns first column to fifth column excluding 4th column...
Write below code PostFetch of table Component.
function removeColumns(cdaData) {
var valueColIndex = 3;
//var valueColIndex2=2; /*initializing 2nd colum with its index */
//var valueColIndex3=1; /*initializing 1st column with its index */
// Remove metadata column
cdaData.metadata.splice(valueColIndex, 1/*remove count*/);
//cdaData.metadata.splice(valueColIndex2, 1/*remove count*/);
//cdaData.metadata.splice(valueColIndex3, 1/*remove count*/);
// Remove resultset column, from each row
cdaData.resultset.forEach(function(row) {
row.splice(valueColIndex, 1/*remove count*/);
//row.splice(valueColIndex2, 1/*remove count*/);
//row.splice(valueColIndex3, 1/*remove count*/);
});
// Return modified cda data set
return cdaData;
}
Write below code in Pre Execution of Table Component
//Specify the columns which you are removin
function f() {
this.chartDefinition.readers = [
{indexes: 3 /* Value2 */},
//{indexes: 1 /* Value2 */}
//{indexes: 2 /* Value2 */}
];
}
Alternative solution which will reduce writing above code :
Write below code in "Post Execution" of table component. column indexes start from 1 ,2,3 and etc if you write this code.
function myTip()
{
$(th:nth-child(5),td:nth-child(5)).hide(); //hides 5th column
$(th:nth-child(),td:nth-child(10)).hide();//hides 10th column
}
NOTE:
1) Query fields indexes start from 0 and ends with N-1 where N is the number of fields coming from query.
2) You can fetch as many columns from the query result set as you want.
3) See the commented code to remove the other columns...
NOTE that the code in Pre Execution may not accurate but worked fine for the requirement.
Thank you.
References :
1) http://forums.pentaho.com/archive/index.php/t-143075.html
2) http://forums.pentaho.com/showthread.php?143075-specifying-columns-for-pie-chart-in-CDE
3)http://www.webdetails.pt/ctools/charts/jsdoc/symbols/pvc.options.charts.Chart.html#readers
A requirement made me to write this post which will talk about fetching few columns on the table component from SQL query.....
Requirement :
Get 5 columns using query in CDA but fetch only 4 columns on the table component...
Fetch columns first column to fifth column excluding 4th column...
Write below code PostFetch of table Component.
function removeColumns(cdaData) {
var valueColIndex = 3;
//var valueColIndex2=2; /*initializing 2nd colum with its index */
//var valueColIndex3=1; /*initializing 1st column with its index */
// Remove metadata column
cdaData.metadata.splice(valueColIndex, 1/*remove count*/);
//cdaData.metadata.splice(valueColIndex2, 1/*remove count*/);
//cdaData.metadata.splice(valueColIndex3, 1/*remove count*/);
// Remove resultset column, from each row
cdaData.resultset.forEach(function(row) {
row.splice(valueColIndex, 1/*remove count*/);
//row.splice(valueColIndex2, 1/*remove count*/);
//row.splice(valueColIndex3, 1/*remove count*/);
});
// Return modified cda data set
return cdaData;
}
Write below code in Pre Execution of Table Component
//Specify the columns which you are removin
function f() {
this.chartDefinition.readers = [
{indexes: 3 /* Value2 */},
//{indexes: 1 /* Value2 */}
//{indexes: 2 /* Value2 */}
];
}
Alternative solution which will reduce writing above code :
Write below code in "Post Execution" of table component. column indexes start from 1 ,2,3 and etc if you write this code.
function myTip()
{
$(th:nth-child(5),td:nth-child(5)).hide(); //hides 5th column
$(th:nth-child(),td:nth-child(10)).hide();//hides 10th column
}
NOTE:
1) Query fields indexes start from 0 and ends with N-1 where N is the number of fields coming from query.
2) You can fetch as many columns from the query result set as you want.
3) See the commented code to remove the other columns...
NOTE that the code in Pre Execution may not accurate but worked fine for the requirement.
Thank you.
References :
1) http://forums.pentaho.com/archive/index.php/t-143075.html
2) http://forums.pentaho.com/showthread.php?143075-specifying-columns-for-pie-chart-in-CDE
3)http://www.webdetails.pt/ctools/charts/jsdoc/symbols/pvc.options.charts.Chart.html#readers
C Program to Create a Binary Tree Using Recursion Linked Representation
![C Program to Create a Binary Tree Using Recursion [Linked Representation]](https://blogger.googleusercontent.com/img/b/R29vZ2xl/AVvXsEjGLSWZDnJJqjV1qzz7_8HUKMvd34NcekdXEWE_BnrB0EMwmONwXoXSjPaKUtk9c-TNQVA2JKbUuuHOR3SYWjH2WuDnW8onVX6Ksqu12JCsexSiUQFlAuINHo2sSs4vos0ueU0mhKloA8el/s640/C+Program+to+Create+a+Binary+Tree+Using+Recursion+%255BLinked+Representation%255D+1.jpg "C Program to Create a Binary Tree Using Recursion [Linked Representation]")
What is Binary Tree?
A tree is said to be a binary tree if each node of the tree can have maximum of two children. Children of a node of binary tree are ordered. One child is called “left” child and the other is called “right” child. An example of binary tree is shown in below diagram.
![C Program to Create a Binary Tree Using Recursion [Linked Representation]](https://blogger.googleusercontent.com/img/b/R29vZ2xl/AVvXsEg-DMCVlJV8IlvtlvjHSAwFhxej9vLkzzlEGb1yzy0OJOK2ergbYUjFoowFlRFTr-7vsm5qjFMAGhuxIeOR3e2IHJ1WXWFlB66yTgPgt0xXW16ayJ9OLt-I0raOO8bPiAG14hIF0XQWXdHN/s640/C+Program+to+Create+a+Binary+Tree+Using+Recursion+%5BLinked+Representation%5D+2.jpg "C Program to Create a Binary Tree Using Recursion [Linked Representation]")
Creation of Binary Tree Using Recursion
A binary tree can be created recursively. The program will work as follow:
1. Read a data in x.
2. Allocate memory for a new node and store the address in pointer p.
3. Store the data x in the node p.
4. Recursively create the left subtree of p and make it the left child of p.
5. Recursively create the right subtree of p and make it the right child of p.
Also Read: C++ program to create Facebook Login screen
Also Read: C++ Program For Linked List Representation Of Linear Queue
The program is written in C language which allows linked representation of binary tree. Code will be as follow:
#include<stdio.h>
typedef struct node
{
int data;
struct node *left;
struct node *right;
}node;
node *create()
{
node *p;
int x;
printf("Enter data(-1 for no data):");
scanf("%d",&x);
if(x==-1)
return NULL;
p=(node*)malloc(sizeof(node));
p->data=x;
printf("Enter left child of %d:
",x);
",x);
p->left=create();
printf("Enter right child of %d:
",x);
",x);
p->right=create();
return p;
}
void preorder(node *t) //address of root node is passed in t
{
if(t!=NULL)
{
printf("
%d",t->data); //visit the root
%d",t->data); //visit the root
preorder(t->left); //preorder traversal on left subtree
preorder(t->right); //preorder traversal om right subtree
}
}
int main()
{
node *root;
root=create();
printf("
The preorder traversal of tree is:
");
The preorder traversal of tree is:
");
preorder(root);
return 0;
}
In the above program I have used preorder traversal to just show that the tree is created properly or not. You can use any other traversal method here.
Bar chart with Target lines in pentaho CDE making bars as lines using java script in pentaho CDE
Hi guys,
This post teach you how to make bars as lines in pentaho CDE.
Source for this post is : http://jsfiddle.net/duarteleao/7maGD/
and http://type-exit.org/adventures-with-open-source-bi/2011/06/creating-dashboards-with-cde/
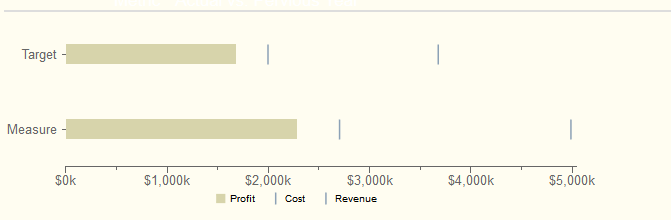
Scenario : Some end users wants visualization of grouped bars as lines where one of the bar is as bar and remaining bars as targeted lines on the same bar.
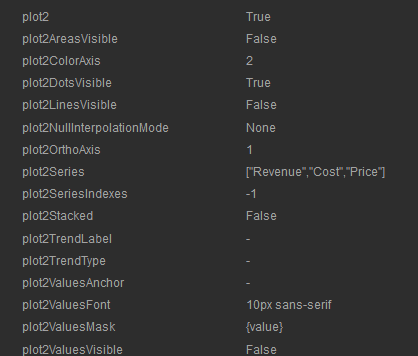
Properties have to give:
Plot2 : True
Find the remaining properties in below image: version of CDE is : 13.06 but will work in higher versions also.
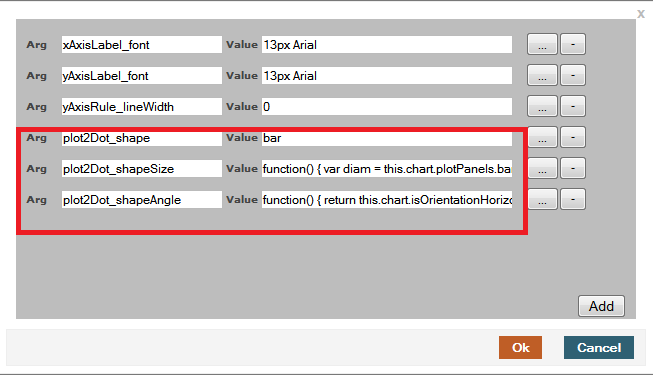
NOTE: Find the image for how to give the above code as properties in Extension points of chart component.
Sample output of the chart on dashboard after giving the above properties.
Sadakar
BI developer
("Learning never exhausts the mind")
This post teach you how to make bars as lines in pentaho CDE.
Source for this post is : http://jsfiddle.net/duarteleao/7maGD/
and http://type-exit.org/adventures-with-open-source-bi/2011/06/creating-dashboards-with-cde/
Scenario : Some end users wants visualization of grouped bars as lines where one of the bar is as bar and remaining bars as targeted lines on the same bar.
Properties have to give:
Plot2 : True
Find the remaining properties in below image: version of CDE is : 13.06 but will work in higher versions also.
In "Extension points" for the chart component you need to give 3 properties from the first link.
They are
extensionPoints: {
plot2Dot_shape: bar,
plot2Dot_shapeSize: function() {
var diam = this.chart.plotPanels.bar.barWidth ||
this.chart.options.barSizeMax;
return this.finished(diam);
},
plot2Dot_shapeAngle: function() {
return this.chart.isOrientationHorizontal() ? 0 : -Math.PI/2;
}
plot2Dot_shape: bar,
plot2Dot_shapeSize: function() {
var diam = this.chart.plotPanels.bar.barWidth ||
this.chart.options.barSizeMax;
return this.finished(diam);
},
plot2Dot_shapeAngle: function() {
return this.chart.isOrientationHorizontal() ? 0 : -Math.PI/2;
}
NOTE: Find the image for how to give the above code as properties in Extension points of chart component.
Sample output of the chart on dashboard after giving the above properties.
Sadakar
BI developer
("Learning never exhausts the mind")
Wednesday, February 11, 2015
C program to check given alphabate is vowel or not using switch case

#include<stdio.h>
#include<conio.h>
void main()
{
char ch;
clrscr();
printf("Enter an alphabate:");
scanf("%c",&ch);
switch(ch)
{
case a:
case A:
case e:
case E:
case i:
case I:
case o:
case O:
case u:
case U:
printf("The alphabate is vowel");
break;
default: printf("The alphabate is not vowel");
}
getch();
}
Tuesday, February 10, 2015
C program to sort an Array by using Bubble sort

#include<stdio.h>
#include<conio.h>
void main()
{
int a[50],n,i,j,temp;
clrscr();
printf("Enter the size of array: ");
scanf("%d",&n);
printf("Enter the array elements: ");
for(i=0;i<n;++i)
scanf("%d",&a[i]);
for(i=1;i<n;++i)
for(j=0;j<(n-i);++j)
if(a[j]>a[j+1])
{
temp=a[j];
a[j]=a[j+1];
a[j+1]=temp;
}
printf("Array after sorting: ");
for(i=0;i<n;++i)
printf("%d ",a[i]);
getch();
}
Thursday, February 5, 2015
Creating a Pentomino game using AS3 Part 17
Today well add the ability to draw holes and cells on the grid.
First of all well declare 3 new variables, 2 of which are booleans set to false by default, and third is a Point variable with default coordinates -1;-1.
In the constructor, add 3 new event listeners for MOUSE_DOWN, MOUSE_UP and ENTER_FRAME events:
The canDraw value will be off when the canvas size window is open, and on when the window is closed. Thats why we can set canDraw to false in the beginning of newLevel() and to true in the end of its editContinue() function:
The mouseDown value is set to true in onMouseDown() and to false in onMouseUp(). Moreover, we set currentCell to -1;-1 point in onMouseUp():
Were using the currentCell variable because our drawing tool will be similar to a brush, but it also has to toggle cells (from a hole to a cell, and from a cell to a hole). If the user once clicked on a cell, it toggles its value. But since we are going to have our drawing code written in an ENTER_FRAME event handler, we need to make sure the same cell doesnt get toggled more than once.
In the onEnterFrame() function, we check if we are allowed to draw and if the mouse is held down. Then we check if the users mouse is rolled over a cell. If it is, we check if that cell does not have the coordinates of currentCell. And if so, we toggle the value, set currentCells coordinates to currently selected cells coordinates and call drawGrid():
Full code so far:
Thanks for reading!
The results:
Read more »
First of all well declare 3 new variables, 2 of which are booleans set to false by default, and third is a Point variable with default coordinates -1;-1.
private var canDraw:Boolean = false;
private var mouseDown:Boolean = false;
private var currentCell:Point = new Point(-1, -1);
In the constructor, add 3 new event listeners for MOUSE_DOWN, MOUSE_UP and ENTER_FRAME events:
addEventListener(MouseEvent.MOUSE_DOWN, onMouseDown);
addEventListener(MouseEvent.MOUSE_UP, onMouseUp);
addEventListener(Event.ENTER_FRAME, onEnterFrame);
The canDraw value will be off when the canvas size window is open, and on when the window is closed. Thats why we can set canDraw to false in the beginning of newLevel() and to true in the end of its editContinue() function:
private function newLevel():void {
canDraw = false;

var newScreen:MovieClip = new new_edit_screen();
addChild(newScreen);
newScreen.tWidth.restrict = "0-9";
newScreen.tHeight.restrict = "0-9";
newScreen.tWidth.text = 10;
newScreen.tHeight.text = 6;
newScreen.incorrect.alpha = 0;
newScreen.btn_continue.addEventListener(MouseEvent.CLICK, editContinue);

function editContinue(evt:MouseEvent):void {
if (newScreen.tWidth.text == "" || newScreen.tHeight.text == "" || newScreen.tWidth.text == "0" || newScreen.tHeight.text == "0") {
newScreen.incorrect.alpha = 1;
return;
}
newScreen.parent.removeChild(newScreen);
mapGrid = [];
var width:int = newScreen.tWidth.text;
var height:int = newScreen.tHeight.text;
for (var i:int = 0; i < height; i++) {
mapGrid[i] = [];
for (var u:int = 0; u < width; u++) {
mapGrid[i][u] = 1;
}
}
// grid settings
calculateGrid();
gridShape.x = gridStartX;
gridShape.y = gridStartY;

// draw tiles
drawGrid();

// canPutShape settings
canPutShape.graphics.clear();
canPutShape.graphics.lineStyle(2, 0xff0000);
canPutShape.graphics.drawRect(0, 0, gridCellWidth, gridCellWidth);
canPutShape.alpha = 0;

canDraw = true;
}
}
The mouseDown value is set to true in onMouseDown() and to false in onMouseUp(). Moreover, we set currentCell to -1;-1 point in onMouseUp():
private function onMouseDown(evt:MouseEvent):void {
mouseDown = true;
}

private function onMouseUp(evt:MouseEvent):void {
mouseDown = false;
currentCell = new Point(-1, -1)
}
Were using the currentCell variable because our drawing tool will be similar to a brush, but it also has to toggle cells (from a hole to a cell, and from a cell to a hole). If the user once clicked on a cell, it toggles its value. But since we are going to have our drawing code written in an ENTER_FRAME event handler, we need to make sure the same cell doesnt get toggled more than once.
In the onEnterFrame() function, we check if we are allowed to draw and if the mouse is held down. Then we check if the users mouse is rolled over a cell. If it is, we check if that cell does not have the coordinates of currentCell. And if so, we toggle the value, set currentCells coordinates to currently selected cells coordinates and call drawGrid():
private function onEnterFrame(evt:Event):void {
// if drawing is allowed and mouse is down
if (canDraw && mouseDown) {
var mousePos:Point = new Point(Math.floor((mouseX - gridStartX) / gridCellWidth), Math.floor((mouseY - gridStartY) / gridCellWidth));
// if valid coordinates
if (mousePos.x < mapGrid[0].length && mousePos.y < mapGrid.length && mousePos.x >= 0 && mousePos.y >= 0) {
// if the cell is not "current cell"
if (mousePos.x != currentCell.x || mousePos.y != currentCell.y) {
currentCell.x = mousePos.x;
currentCell.y = mousePos.y;
if (mapGrid[mousePos.y][mousePos.x] == 1) {
mapGrid[mousePos.y][mousePos.x] = 0;
}else {
mapGrid[mousePos.y][mousePos.x] = 1;
}
drawGrid();
}
}
}
}
Full code so far:
package
{
import flash.display.MovieClip;
import flash.display.Sprite;
import flash.events.Event;
import flash.events.KeyboardEvent;
import flash.events.MouseEvent;
import flash.geom.Point;
import flash.sampler.NewObjectSample;
import flash.utils.ByteArray;

/**
 * Open-source pentomino game engine
 * @author Kirill Poletaev
 */

public class pentomino_editor extends MovieClip
{
private var mapGrid:Array = [];
private var shapeButtons:Array = [];

private var gridShape:Sprite = new Sprite();
private var canPutShape:Sprite = new Sprite();
private var gridStartX:int;
private var gridStartY:int;
private var gridCellWidth:int;
private var canDraw:Boolean = false;
private var mouseDown:Boolean = false;
private var currentCell:Point = new Point(-1, -1);

public function pentomino_editor()
{
addEventListener(MouseEvent.MOUSE_MOVE, onMouseMove);
addEventListener(MouseEvent.MOUSE_DOWN, onMouseDown);
addEventListener(MouseEvent.MOUSE_UP, onMouseUp);
addEventListener(Event.ENTER_FRAME, onEnterFrame);

// add shape buttons
for (var i:int = 0; i < 4; i++) {
for (var u:int = 0; u < 3; u++) {
var shapeButton:MovieClip = new edit_shape();
shapeButton.x = 528 + u * 62;
shapeButton.y = 15 + i * 84;
addChild(shapeButton);
shapeButton.bg.alpha = 0.3;
shapeButton.shape.gotoAndStop(3 * i + u + 1);
shapeButtons.push(shapeButton);
shapeButton.addEventListener(MouseEvent.ROLL_OVER, buttonOver);
shapeButton.addEventListener(MouseEvent.ROLL_OUT, buttonOut);
}
}

// buttons
btn_mainmenu.addEventListener(MouseEvent.CLICK, doMainmenu);
btn_reset.addEventListener(MouseEvent.CLICK, function():void{newLevel()});

// new level
newLevel();

addChild(gridShape);
addChild(canPutShape);
}

private function onMouseMove(evt:MouseEvent):void {
if(mapGrid.length>0){
var mousePos:Point = new Point(Math.floor((mouseX - gridStartX) / gridCellWidth), Math.floor((mouseY - gridStartY) / gridCellWidth));
canPutShape.x = mousePos.x * gridCellWidth + gridStartX;
canPutShape.y = mousePos.y * gridCellWidth + gridStartY;
if (mousePos.x < mapGrid[0].length && mousePos.y < mapGrid.length && mousePos.x >= 0 && mousePos.y >= 0) {
canPutShape.alpha = 1;
}else {
canPutShape.alpha = 0;
}
}
}

private function newLevel():void {
canDraw = false;

var newScreen:MovieClip = new new_edit_screen();
addChild(newScreen);
newScreen.tWidth.restrict = "0-9";
newScreen.tHeight.restrict = "0-9";
newScreen.tWidth.text = 10;
newScreen.tHeight.text = 6;
newScreen.incorrect.alpha = 0;
newScreen.btn_continue.addEventListener(MouseEvent.CLICK, editContinue);

function editContinue(evt:MouseEvent):void {
if (newScreen.tWidth.text == "" || newScreen.tHeight.text == "" || newScreen.tWidth.text == "0" || newScreen.tHeight.text == "0") {
newScreen.incorrect.alpha = 1;
return;
}
newScreen.parent.removeChild(newScreen);
mapGrid = [];
var width:int = newScreen.tWidth.text;
var height:int = newScreen.tHeight.text;
for (var i:int = 0; i < height; i++) {
mapGrid[i] = [];
for (var u:int = 0; u < width; u++) {
mapGrid[i][u] = 1;
}
}
// grid settings
calculateGrid();
gridShape.x = gridStartX;
gridShape.y = gridStartY;

// draw tiles
drawGrid();

// canPutShape settings
canPutShape.graphics.clear();
canPutShape.graphics.lineStyle(2, 0xff0000);
canPutShape.graphics.drawRect(0, 0, gridCellWidth, gridCellWidth);
canPutShape.alpha = 0;

canDraw = true;
}
}

private function calculateGrid():void {
var columns:int = mapGrid[0].length;
var rows:int = mapGrid.length;

// free size: 520x460
// fit in: 510x450

// calculate width of a cell:
gridCellWidth = Math.round(510 / columns);

var width:int = columns * gridCellWidth;
var height:int = rows * gridCellWidth;

// calculate side margin
gridStartX = (520 - width) / 2;

if (height < 450) {
gridStartY = (450 - height) / 2;
}
if (height >= 450) {
gridCellWidth = Math.round(450 / rows);
height = rows * gridCellWidth;
width = columns * gridCellWidth;
gridStartY = (460 - height) / 2;
gridStartX = (520 - width) / 2;
}
}

private function drawGrid():void {
gridShape.graphics.clear();
var width:int = mapGrid[0].length;
var height:int = mapGrid.length;

var i:int;
var u:int;

// draw background
for (i = 0; i < height; i++) {
for (u = 0; u < width; u++) {
if (mapGrid[i][u] == 1) drawCell(u, i, 0xffffff, 1, 0x999999);
}
}
}

private function drawCell(width:int, height:int, fill:uint, thick:Number, line:uint):void {
gridShape.graphics.beginFill(fill);
gridShape.graphics.lineStyle(thick, line);
gridShape.graphics.drawRect(width * gridCellWidth, height * gridCellWidth, gridCellWidth, gridCellWidth);
}

private function buttonOver(evt:MouseEvent):void {
evt.currentTarget.bg.alpha = 1;
}

private function buttonOut(evt:MouseEvent):void {
evt.currentTarget.bg.alpha = 0.3;
}

private function doMainmenu(evt:MouseEvent):void {
(root as MovieClip).gotoAndStop(1);
}

private function onMouseDown(evt:MouseEvent):void {
mouseDown = true;
}

private function onMouseUp(evt:MouseEvent):void {
mouseDown = false;
currentCell = new Point(-1, -1)
}

private function onEnterFrame(evt:Event):void {
// if drawing is allowed and mouse is down
if (canDraw && mouseDown) {
var mousePos:Point = new Point(Math.floor((mouseX - gridStartX) / gridCellWidth), Math.floor((mouseY - gridStartY) / gridCellWidth));
// if valid coordinates
if (mousePos.x < mapGrid[0].length && mousePos.y < mapGrid.length && mousePos.x >= 0 && mousePos.y >= 0) {
// if the cell is not "current cell"
if (mousePos.x != currentCell.x || mousePos.y != currentCell.y) {
currentCell.x = mousePos.x;
currentCell.y = mousePos.y;
if (mapGrid[mousePos.y][mousePos.x] == 1) {
mapGrid[mousePos.y][mousePos.x] = 0;
}else {
mapGrid[mousePos.y][mousePos.x] = 1;
}
drawGrid();
}
}
}
}

}

}
Thanks for reading!
The results:
PhoneGap creating forms and validating forms example using jquerymobile
Hi friends,
I am going to explain you how to create forms and validate them according to input.
Title: Creating forms using jquerymobile and validating them and sending request to server and getting some response from server.
Here is the project structure :
 colors.css
{color:#FF0000;font-weight:bold;I am going to explain you how to create forms and validate them according to input.
Title: Creating forms using jquerymobile and validating them and sending request to server and getting some response from server.
Here is the project structure :

label
.missing}
wait.gif
Add the following image

index.html
<!
DOCTYPE html> <
html> <head> <title>New Claim</title> <link rel="stylesheet" href="http://code.jquery.com/mobile/1.0a2/jquery.mobile-1.0a2.min.css" /><link rel="stylesheet" href="css/colors.css"><script src="http://code.jquery.com/jquery-1.4.4.min.js"></script><script src="http://code.jquery.com/mobile/1.0a2/jquery.mobile-1.0a2.min.js"></script><script> // Global declarations - assignments made in $(document).ready() belowvar hdrMainvar = null;var contentMainVar = null;var ftrMainVar = null;var contentTransitionVar = null;var stateLabelVar = null;var whatLabelVar = null;var stateVar = null;var whatVar = null;var form1var = null;var confirmationVar = null;var contentDialogVar = null;var hdrConfirmationVar = null; var contentConfirmationVar = null;var ftrConfirmationVar = null;var inputMapVar = null;// Constantsvar MISSING = "missing";var EMPTY = "";var NO_STATE = "ZZ";</script></
head> <
body> <!-- Page starts here -->
<
div data-role="page" data-theme="a" id="page1"><div data-role="header" id="hdrMain" name="hdrMain" data-nobackbtn="true"><h1>Simple Registration</h1></div><div data-role="content" id="contentMain" name="contentMain"> <form id="form1"><div id="shipDiv" data-role="fieldcontain"><label for="title">Title*</label> <input id="title" name="title_r" type="text" /></div><div id="fnameDiv" data-role="fieldcontain"><label for="fname" id="fnameLabel" name="fnameLabel">First name*</label> <input id="fname" name="fname_r" type="text" /></div><div id="lnameDiv" data-role="fieldcontain"><label for="lname">Last name*</label> <input id="lname" name="lname_r" type="text" /></div><div id="emailDiv" data-role="fieldcontain"><label for="email">Email*</label> <input id="email" name="email_r" type="text" /></div><div id="phoneDiv" data-role="fieldcontain"><label for="phone">Phone</label> <input id="phone" name="phone" type="text"/></div><div id="streetDiv" data-role="fieldcontain"><label for="street">Street address*</label> <input id="street" name="street_r" type="text" /></div><div id="cityDiv" data-role="fieldcontain"><label for="city">City*</label> <input id="city" name="city_r" type="text" /></div><div id="stateDiv" data-role="fieldcontain"><label id="stateLabel" for="state">State*</label> <select id="state" name="state_r" tabindex="2"><option value="ZZ">Please select a state</option><option value="AL">Alabama</option><option value="AK">Alaska</option><option value="AZ">Arizona</option><option value="AR">Arkansas</option><option value="CA">California</option><option value="CO">Colorado</option><option value="CT">Connecticut</option><option value="DE">Delaware</option><option value="FL">Florida</option><option value="GA">Georgia</option><option value="HI">Hawaii</option><option value="ID">Idaho</option><option value="IL">Illinois</option><option value="IN">Indiana</option><option value="IA">Iowa</option><option value="KS">Kansas</option><option value="KY">Kentucky</option><option value="LA">Louisiana</option><option value="ME">Maine</option><option value="MD">Maryland</option><option value="MA">Massachusetts</option><option value="MI">Michigan</option><option value="MN">Minnesota</option><option value="MS">Mississippi</option><option value="MO">Missouri</option><option value="MT">Montana</option><option value="NE">Nebraska</option><option value="NV">Nevada</option><option value="NH">New Hampshire</option><option value="NJ">New Jersey</option><option value="NM">New Mexico</option><option value="NY">New York</option><option value="NC">North Carolina</option><option value="ND">North Dakota</option><option value="OH">Ohio</option><option value="OK">Oklahoma</option><option value="OR">Oregon</option><option value="PA">Pennsylvania</option><option value="RI">Rhode Island</option><option value="SC">South Carolina</option><option value="SD">South Dakota</option><option value="TN">Tennessee</option><option value="TX">Texas</option><option value="UT">Utah</option><option value="VT">Vermont</option><option value="VA">Virginia</option><option value="WA">Washington</option><option value="WV">West Virginia</option><option value="WI">Wisconsin</option><option value="WY">Wyoming</option></select></div><div id="zipDiv" data-role="fieldcontain"><label for="zip">Postal code*</label> <input id="zip" name="zip_r" type="text"/></div><div id="whatDiv" data-role="fieldcontain"><label id="whatLabel" for="what">Please explain what happened*:</label><textarea cols="40" rows="8" id="what" name="what_r"></textarea></div><div id="submitDiv" data-role="fieldcontain"> <input type="submit" value="Submit Claim" data-inline="true"/></div></form></div><!-- contentMain --><div data-role="footer" id="ftrMain" name="ftrMain"></div><div align="CENTER" data-role="content" id="contentDialog" name="contentDialog"> <div>Please fill in all required fields before submitting the form.</div><a id="buttonOK" name="buttonOK" href="#page1" data-role="button" data-inline="true">OK</a></div> <!-- contentDialog --><!-- contentTransition is displayed after the form is submitted until a response is received back. --><div data-role="content" id="contentTransition" name="contentTransition"> <div align="CENTER"><h4>Your claim has been sent. Please wait.</h4></div><div align="CENTER"><img id="spin" name="spin" src="img/wait.gif"/></div></div> <!-- contentTransition --><!-- Although stored within page1 div tag, hdrConfirmation, contentConfirmation and ftrConfirmation represent a self contained confirmation page --><div data-role="header" id="hdrConfirmation" name="hdrConfirmation" data-nobackbtn="true"><h1>Claim Created</h1></div><div data-role="content" id="contentConfirmation" name="contentConfirmation" align="center"> <p>A new claim has been created based on data you have submitted.</p> <p>Your confirmation number is: <span id="confirmation" name="confirmation"></span> </p></div><!-- contentConfirmation --> <div data-role="footer" id="ftrConfirmation" name="ftrConfirmation"></div> <script>$(document).ready(
function() {// Assign global variableshdrMainVar = $(
#hdrMain);contentMainVar = $(
#contentMain);ftrMainVar = $(
#ftrMain);contentTransitionVar = $(
#contentTransition);stateLabelVar = $(
#stateLabel);whatLabelVar = $(
#whatLabel);stateVar = $(
#state);whatVar = $(
#what);form1Var = $(
#form1);confirmationVar = $(
#confirmation);contentDialogVar = $(
#contentDialog);hdrConfirmationVar = $(
#hdrConfirmation);contentConfirmationVar = $(
#contentConfirmation);ftrConfirmationVar = $(
#ftrConfirmation); inputMapVar = $(
input[name*="_r"]);hideContentDialog();
hideContentTransition();
hideConfirmation();
});
$(
#buttonOK).click(function() {hideContentDialog();
showMain();
return false; });
$(
#form1).submit(function() {var err = false;// Hide the Main contenthideMain();
// Reset the previously highlighted form elementsstateLabelVar.removeClass(MISSING);
whatLabelVar.removeClass(MISSING);
inputMapVar.each(
function(index){ $(
this).prev().removeClass(MISSING); });
// Perform form validationinputMapVar.each(
function(index){ if($(this).val()==null || $(this).val()==EMPTY){ $(
this).prev().addClass(MISSING); err =
true;}
});
if(stateVar.val()==NO_STATE){ stateLabelVar.addClass(MISSING);
err =
true;}
if(whatVar.val()==null||whatVar.val()==EMPTY){ whatLabelVar.addClass(MISSING);
err =
true;}
// If validation fails, show Dialog contentif(err == true){ showContentDialog();
return false;}
// If validation passes, show Transition contentshowContentTransition();
// Submit the form$.post(
"requestProcessor.php", form1Var.serialize(), function(data){confirmationVar.text(data);
hideContentTransition();
showConfirmation();
});
return false; });
function hideMain(){hdrMainVar.hide();
contentMainVar.hide();
ftrMainVar.hide();
}
function showMain(){hdrMainVar.show();
contentMainVar.show();
ftrMainVar.show();
}
function hideContentTransition(){contentTransitionVar.hide();
}
function showContentTransition(){contentTransitionVar.show();
}
function hideContentDialog(){contentDialogVar.hide();
}
function showContentDialog(){contentDialogVar.show();
}
function hideConfirmation(){hdrConfirmationVar.hide();
contentConfirmationVar.hide();
ftrConfirmationVar.hide();
}
function showConfirmation(){hdrConfirmationVar.show();
contentConfirmationVar.show();
ftrConfirmationVar.show();
}
</script></
div> <!-- page1 --><!-- Page ends here -->
</
body></
html>OutPut

Subscribe to:
Posts (Atom)