Thursday, February 19, 2015
Installation of Pentaho 5 0 1 CE in windows 7 changes made from previous version
First of all, Id like to thank you to the web details team for the efforts they kept in bringing up the powerful analytical engine(BA server).
The home page itself make you to stick with BA server where you can enter into the server with "admin" and "password" as the default credentials.. Yes, "joe" user is no more but he left with the same password to log into BA server.
There will be NO more admin console ... Now it is very easy and developer friendly to navigate in one console(User Console) to give data base connections and new roles for new users..
A lot of stuff included in the home page itself, giving the blogs links, books on different tools of pentaho family. In a single word I can say , All the stuff related to Pentaho at a single place. A BI developer like me can reduce the time for developing reports, dashboards , jobs.
Market place for installing C-Tools and the installed plug-ins list drop down is one of the good ideas of the team.
As quick as Pentaho released its CE 5.0.1 , I just downloaded and trying to explore the new look and navigating from all the menus, reports, connection places and etc.
Its very easy to install the pentaho CE BA now in windows...
Installation procedure :
1) Down load the software as a .zip file using this link .
2) Unzip it in your fav folder
3) Click on start-pantaho.bat file
Home page :
NOTE: path and class path for java must be set before the installation.

Wednesday, February 18, 2015
Kettle Pass parameters from job to transformation in PDI Retrieve data from table by passing table name as parameter
Software Setup :
PDI 5.1.0 CE
PostgreSQL
Concept : Retrieve data from table by passing table name as parameter.
You will learn below things
1) Table input step & database connections
2) Creating parameter(s) in Transformation(s) & Job(s)
3) Passing parameter(s) from job to transformation.
Lets say in foodmart database you have below tables 1) region 2) product 3) customer and etc.
Every time when you pass different table name as parameter you should able to fetch the data coming from the passed table.
1) Table input step & database connections
2) Creating parameter(s) in Transformation(s) & Job(s)
1) Create a new transformation & drag and drop "Table Input" step from Design Pane.

2) Double Click on "Table input" step & Click on New tab to give database connections as shown in below image

3) Define the parameter in transformation ( in this example the table name should go as parameter).
Image A : Right Click on the empty space to get the transformation settings.
Image B : Database Connection Details
Parameter Name is : tableName


4) Come back to the properties of "Table input" & write select statement to retrieve the data.
Eg : SELECT * FROM product LIMIT 100
In above example "product" is the table name that you have to replace with the parameter.
i.e., SELECT * FROM ${tableName} LIMIT 100
Once you write the query, come down check "Replace variables in script"

5) Take a "Dummy" step and connect it to "Table input step" . Save the transformation & run it on "Dummy Step"( Right click dummy step and click on "Preview".
OUTPUT : Test 1 : With "region" table

OUTPUT : Result 1

OUTPUT : Test 2 : With "product" table
* Right click Dummy step then click on Preview
* Click on Configure & then in parameters tab give "product" for tableName value parameter.
OUTPUT : Result 2

3) Passing parameter(s) from job to transformation
* Crtl+Alt to create a new job
* From the "General" node of Design tab ( Appears left side) drag and drop "Transoformation step".
* Drag and drop "START" step and connect these two as shown in below image.

* Double click on "Transformation" step to set the properties & parameter information.
* Browse for the transformation file and then move to parameters tab
* Click on "Get Parameters" then you can find parameter get apper under Parameter tab.
* Right click on empty canvas of job to get its settings & move to Parameters tab and give parameter name as "tableName" and provide default value.
Save the job and run it.
IMP NOTE :
1) Parameter names in job & transformation should match.
2) You can create n number of parameters in job but can pass as many you wish.
3) In job design you should take "START" step to tell the job to start execution from there.
If you ignore you will get below error ( which took me awhile to solve it for the very first time).
Start of job execution
:A serious error occurred during job execution:
Couldnt find starting point in this job.
org.pentaho.di.core.exception.KettleJobException:
Couldnt find starting point in this job.
at org.pentaho.di.job.Job.execute(Job.java:516)
at org.pentaho.di.job.Job.run(Job.java:422)
Spoon - Job has ended.
References :
1) http://wiki.pentaho.com/display/EAI/Named+Parameters
2) http://diethardsteiner.blogspot.in/2013/07/pentaho-kettle-parameters-and-variables.html
3) http://wiki.pentaho.com/display/EAI/Substituting+variable+references+in+Job+Parameter+values
Hope this helps some one like me for the first time who is looking for parameters(named) concept :-)
Cheers :-)
:-) Happy New Year - Welcome - 2015 :-)
Its time to start changing from Win XP to Windows7

Businesses are finally prying their hands from Microsoft s Windows XP as they warm to Windows 7 .
"Over the years, IT has had a real love affair with XP," said Diane Hagglund, an analyst at Dimensional Research, which surveyed 923 IT professionals about their Windows operating system adoption plans in January. "It was just a great OS. It just worked for them. But that feeling is going away."
In the new study, 40% of the respondents said that theyre worried about the hassles of maintaining the nearly nine-year-old Windows XP as it gets increasingly outdated -- up from 28% in an April 2009 Dimensional survey.
Meanwhile, 60% of the respondents said theyre worried about the cost and overhead of migrating to Windows 7, but that figure is down from 72% last year.
Confidence in Windows 7 has climbed since it shipped. Last April, 67% of those polled said they had concerns about Windows 7, which had not yet been released; this year, only 56% said they did.
"The difference was the release of the operating system, the biggest part of that from hands-on experience," Hagglund said, explaining why some in IT have changed their minds about Windows 7. "Theyre trying it at home, many of them, long before it comes to them professionally, so they know what its like."
This story was originally published in Computerworld.com.
Businesses and individual users should start changing before time catches up with them and support for Windows XP is no longer available.
Sunday, February 15, 2015
Migrating data from Oracle database to Postgresql database using Pentaho Kettle
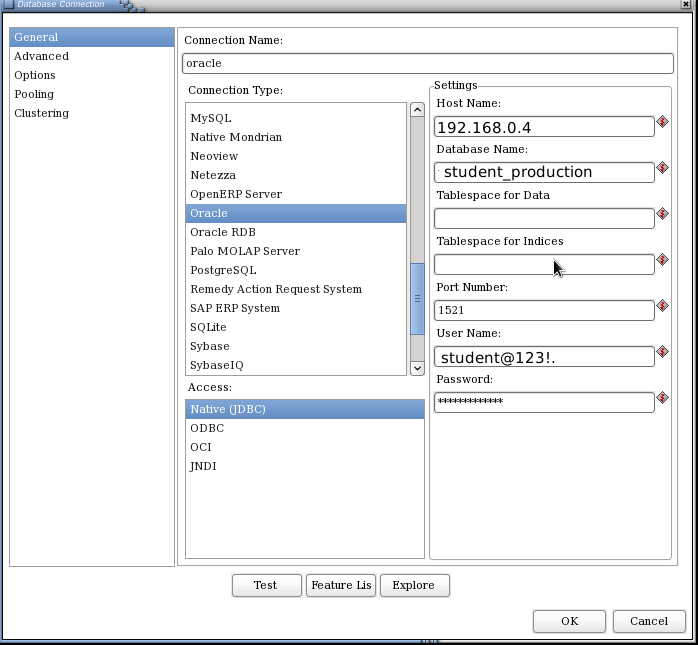
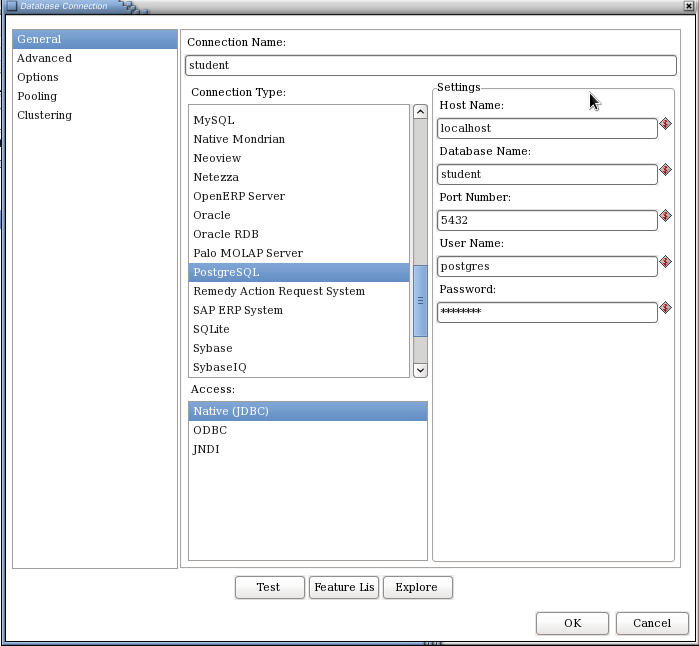
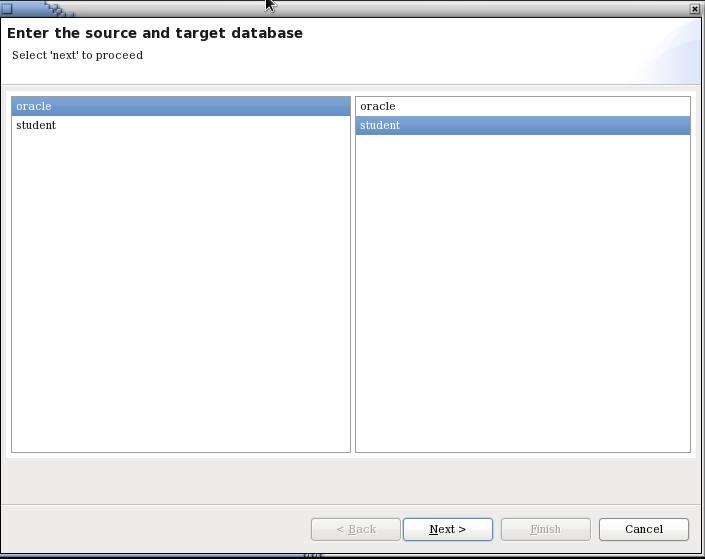
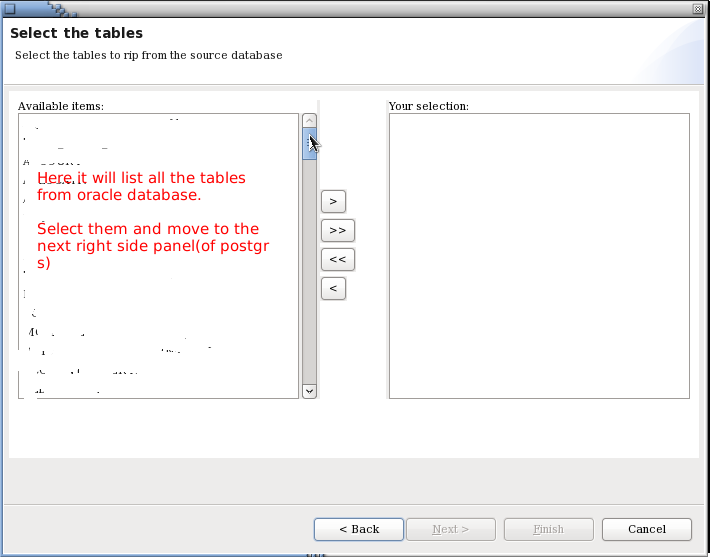
http://wiki.pentaho.com/display/COM/Using+the+Copy+Table+Wizard
Best Way to Easily Find and Remove Broken Links from your Website or Blog

What are Broken Links?
Broken links are the links which leads to a page that actually does not exist. When you publish any article on your blog than search engines like Google indexe it and add your article information to its database. After some days or months if you delete your previously published article than it is removed from your blog database but not from Google database. If anyone search for a keyword related to your article on Google than your article link come up in the search results. And if he/she clicks on the link then it leads to a 404 error page.Also Read: The Top 10 Websites to create free Logo for your Blog
Also Read: Tips on How to Have Better SEO Results with Link Building
How to Find and Remove Broken Links?


Saturday, February 14, 2015
Choosing A Strong Password To Protect yourself from Hackers
 |
| How To Protect Yourself |
Password strength is a measure of the effectiveness of a password in resisting guessing and brute-force attacks. In its usual form, it estimates how many trials an attacker who does not have direct access to the password would need, on average, to guess it correctly. The strength of a password is a function of length, complexity, and unpredictability.
1.Minimum length 8 characters :
►As a rule of thumb, your password must never be below 8 characters. If an attacker happens to use a brute-force attack on your account,which is just trying every possible comobination - with every addition of a character the time taken for the BF attack to crack your password increases exponentially. On average, while it may take just a few minutes to crack open a 6 character password, the time taken for cracking an 8 character password is measured in days and weeks. Assuming your attacker doesnt have a a billion dollar ExaFlop supercomputer after your account, your password is reasonably safe if it is over 8 characters in length(ExaFlop = 10^18 calculations per second).
2.Names and 123 are out of the question :
►The most common passwords are "Name123". Whenever someone is after your account, the first thing they try is common passwords like this. Whoever that person is, you have to assume the worst. It might be some random old guy in his moms garage or maybe your best friend goofing around, you must assume they know everything about you- your name(duh), amily members names, favorite sportsmen, actors, singers- everything. This is the safest way to go. A surprisingly large number of people simply append a 123 to the front or back of a common object thinking they are very smart, but this is the most predictable password there is. Most hackers will start straight away by adding that 123, and if your password is anything like this, youre screwed. Change it ASAP!
One more thing that deserves mention here is the so called "Security Question". Reason being that people who know you will know questions about you like "What was your first pets name?" or "In what town were you born?" - some of the most common security questions. Plus, the people who know you are far more likely to be interested in taking a peek at your private messages than a random old guy in a garage.
Hence, I recommend to never actually use the security questions in the way they are meant to be used. Dont use a direct answer, use something that the question reminds you of. While these may offer another layer of protection from annonymous attackers, they can make cracking your account fairly easy by the people who know you. As an example, someone you know well if left alone with access to your mobile phone might be able to get into your Facbook account with no difficulties at all. Always treat security question as an emergency password, it should be unobvious but easy to remember.
3.Random things? Think again.
►Theres something called a dictionary attack. In a nutshell, it means that your attacker has a dictionary, and a program that will throw every word in the dictionary as an attempt to crack your password. After trying out your own and related names +123, this is what the Hacker is going to try next - A dictionary attack. So it is better if you keep your password well away from any real words.
Although still not a 100% safe, potjack123 is much safer than jackpot123.
4.Turn it around :
►Now a password like aGF$hvYH916!~** is probably as safe as it can get, but its not exactly easy to remember and definitely not easy to type quickly. For this reason, I(for one) turn words around. What I mean by that is instead of using velocity, use yticolev. While as a normal word, its easy to guess but after reversing the characters its unrecognizable.
After a few times, youll get used to it and will be able to type it as quickly as the other one.
5.Throw in symbols and numbers easily :
►If youre like most people, your current passwords probably dont have any weird symbols. But I have a quick way of adding both numbers and symbols to your password.
Heres an example -
567yticolev%^&
Looks weird, right? Well thats the point. What we have here is, the base word velocity - reversed, a 567 at the start (which is much better than a 123), and at the end I have seemingly random symbols which are actually just SHIFT + 567, that is these are actually the ones written above 567 on your keyboard respectively. So all you have to remember is velocity and 567 and within a few days youll be able to type this as fast as any other password but only this one will be relatively impenetrable. (Unless of course you have a supercomputer after your ass, in which case youre screwed XD)
6.Capitalize- The final blow :
►You might be wondering whats the point of adding so much random stuff to your password. Our main goal is basically to expand the number of characters which your attacker has to test to find your password. So - Small alphabets = 26 characters, Numbers = 10 more, Symbols = around 20 more. But if you throw in even just one Capital alphabet, that means your attacker has another 26 freaking characters to test which means, in this case, hes screwed. Reason being the brute-force attack I mentioned earlier. Say your password is the one in the last point with a capital V and Y :
567YticoleV%^&
So thats 14 characters with upper and lower case alphabets, numbers and symbols. Believe it or not, such is the power of exponential growth that it will actually take an average computer BILLIONS even TRILLIONS of years to crack your password. Now even if your insane attacker can somehow get a supercomputer, it would take him several thousands of years to get your password. After even a fraction of this time we can safely assume that he would have lost all his money buying the supercomputer and the will to do whatever he wanted to do with your account. (You can calculate the exact time by using permutations and combinations and the speed of the CPU)
One last thing, by using the same passwords for several different accounts youll only be making the hackers job easier. But yes, remembering a dozen passwords is probably not worth it. For this I suggest making tiny changes. If you use 567velocity for gmail, you can use 456velocity for facebook, 678velocity for yahoo etc. To hack the next account the hacker will have to go through all the combinations all over again and that for him, will probably not be worth it.
So there you have it! For all practical purposes a password like this will be impenetrable throughout your lifetime. (Nevertheless, I still recommend changing your password around twice a year or so. Thats because youre not the only one reading this article.)
C Program to Print an Alphabet from A to L of s in Capital Letter

#include<iostream>
using namespace std;
int main()
{
int i,j,k=1;
char ch;
cout<<"Input an Alphabet in capital letters that you want to print:";
cin>>ch;
cout<<"
";
switch(ch)
{
case A:
cout<<" ";
for(i=1;i<=40;++i)
{
for(j=0;j<=22;++j)
{
if(i==1||i==2||i==21||i==20)
cout<<"*";
else
{
if(j==0||j==20)
cout<<"**";
else
cout<<" ";
}
}
cout<<"
";
}
break;
case B:
cout<<" ";
while(k<=2)
{
for(i=1;i<=9;++i)
{
for(j=0;j<=i;++j)
{
if(j==0||j==i)
cout<<"**";
else
cout<<" ";
}
cout<<"
";
}
for(i=1;i<=10;++i)
{
if(i==1||i==10)
cout<<"**";
else
cout<<" ";
}
cout<<"
";
for(i=1;i<=10;++i)
{
if(i==1||i==10)
cout<<"**";
else
cout<<" ";
}
cout<<"
";
for(i=9;i>=1;--i)
{
for(j=0;j<=i;++j)
{
if(j==0||j==i)
cout<<"**";
else
cout<<" ";
}
cout<<"
";
}
++k;
}
break;
caseC:
cout<<" ";
for(i=1;i<=40;++i)
{
for(j=0;j<=22;++j)
{
if(i==1||i==2||i==39||i==40)
cout<<"*";
else
{
if(j==0)
cout<<"**";
else
cout<<" ";
}
}
cout<<"
";
}
break;
caseD:
cout<<" ";
for(i=1;i<=18;++i)
{
for(j=0;j<=i;++j)
{
if(j==0||j==i)
cout<<"**";
else
cout<<" ";
}
cout<<"
";
}
while(k<=4)
{
for(i=1;i<=19;++i)
{
if(i==1||i==19)
cout<<"**";
else
cout<<" ";
}
cout<<"
";
++k;
}
for(i=18;i>=1;--i)
{
for(j=0;j<=i;++j)
{
if(j==0||j==i)
cout<<"**";
else
cout<<" ";
}
cout<<"
";
}
break;
caseE:
cout<<" ";
for(i=1;i<=39;++i)
{
for(j=1;j<=20;++j)
{
if(i==1||i==2||i==20||i==21||i==38||i==39)
cout<<"*";
else
{
if(j==1)
cout<<"**";
else
cout<<" ";
}
}
cout<<"
";
}
break;
caseF:
cout<<" ";
for(i=1;i<=40;++i)
{
for(j=1;j<=20;++j)
{
if(i==1||i==2||i==18||i==19)
cout<<"*";
else
{
if(j==1)
cout<<"**";
else
cout<<" ";
}
}
cout<<"
";
}
break;
caseG:
cout<<" ";
for(i=1;i<=25;++i)
{
for(j=1;j<=20;++j)
{
if(i==1||i==2)
cout<<"*";
else
{
if(j==1)
cout<<"**";
else
cout<<" ";
}
}
cout<<"
";
}
for(i=1;i<=10;++i)
{
for(j=1;j<=20;++j)
{
if(i==1||i==2)
{ if(j==1||j==14||j==15||j==16)
cout<<"**";
else
cout<<" ";
}
else
{
if(i==9||i==10)
cout<<"*";
else
{ if(j==1||j==18)
cout<<"**";
else
cout<<" ";
}
}
}
cout<<"
";
}
break;
caseH:
cout<<" ";
for(i=1;i<=40;++i)
{
for(j=1;j<=21;++j)
{
if(i==20||i==21)
cout<<"*";
else
{
if(j==1||j==19)
cout<<"**";
else
cout<<" ";
}
}
cout<<"
";
}
break;
caseI:
cout<<" ";
for(i=1;i<=40;++i)
{
for(j=1;j<=30;++j)
{
if(i==1||i==2||i==39||i==40)
cout<<"*";
else
{
if(j==15)
cout<<"**";
else
cout<<" ";
}
}
cout<<"
";
}
break;
caseJ:
cout<<" ";
for(i=1;i<=30;++i)
{
for(j=1;j<=28;++j)
{
if(i==1||i==2)
cout<<"*";
else
{
if(j==14)
cout<<"**";
else
cout<<" ";
}
}
cout<<"
";
}
for(i=1;i<=10;++i)
{
for(j=1;j<=15;++j)
{
if(i==10||i==9)
cout<<"*";
else
{
if(j==1||j==13)
cout<<"**";
else
cout<<" ";
}
}
cout<<"
";
}
break;
caseK:
cout<<" ";
for(i=20;i>=1;--i)
{
for(j=0;j<=i;++j)
{
if(j==0||j==i)
cout<<"**";
else
cout<<" ";
}
cout<<"
";
}
for(i=1;i<=20;++i)
{
for(j=0;j<=i;++j)
{
if(j==0||j==i)
cout<<"**";
else
cout<<" ";
}
cout<<"
";
}
break;
caseL:
cout<<" ";
for(i=1;i<=40;++i)
{
for(j=1;j<=25;++j)
{
if(i==39||i==40)
cout<<"*";
else
{
if(j==1)
cout<<"**";
else
cout<<" ";
}
}
cout<<"
";
}
break;
}
return 0;
}
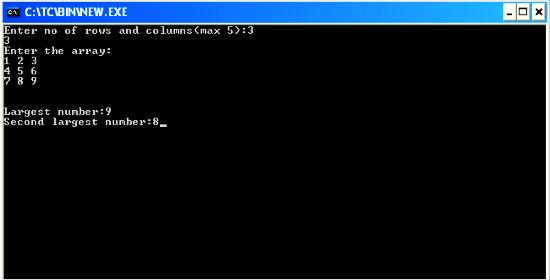
C program to find largest and second largest no from a 2D array
#include<iostream.h>
#include<conio.h>
void main()
{
clrscr();
int a[5][5],big1,big2,n,m,i,j;
cout<<"Enter no of rows and columns(max 5):";
cin>>m>>n;
cout<<"Enter the array:
";
for(i=0;i<m;i++)
for(j=0;j<n;++j)
cin>>a[i][j];
big1=a[0][0];
for(i=0;i<m;++i)
for(j=0;j<n;++j)
{
if(a[i][j]>big1)
big1=a[i][j];
}
big2=a[0][0];
for(i=0;i<m;++i)
for(j=0;j<n;++j)
{
if(a[i][j]>big2&&a[i][j]<big1)
big2=a[i][j];
}
cout<<"
Largest number:"<<big1;
cout<<"
Second largest number:"<<big2;
getch();
}
Friday, February 13, 2015
C program which reads your name from the keyboard and outputs a list of ASCII codes which represent your name

#include<stdio.h>
#include<conio.h>
void main()
{
int i;
char name[50];
clrscr();
printf("Enter your name: ");
gets(name);
printf("
Character ASCII Code");
for(i=0;name[i]!=
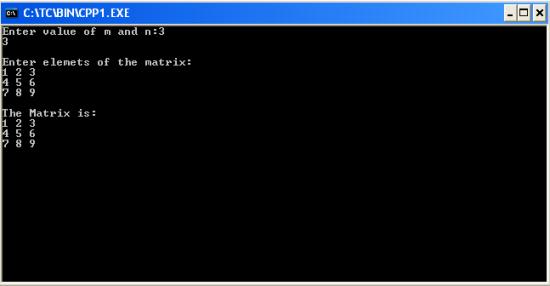
C program to read a matrix of size mxn from the keyboard and display the same on the screen
#include<iostream.h>
#include<conio.h>
void main()
{
clrscr(); //to clear the screen
int a[5][5],n,m,i,j;
cout<<"Enter value of m and n:";
cin>>m>>n;
cout<<"
Enter elemets of the matrix:
";
for(i=0;i<m;++i)
for(j=0;j<n;++j)
cin>>a[i][j];
cout<<"
The Matrix is:
";
for(i=0;i<m;++i)
{
for(j=0;j<n;++j)
cout<<a[i][j]<<" ";
cout<<"
";
}
getch(); //to stop the screen
}
Thursday, February 12, 2015
Fetch selected columns from SQL query on Table Component using Penaho CDE
A requirement made me to write this post which will talk about fetching few columns on the table component from SQL query.....
Requirement :
Get 5 columns using query in CDA but fetch only 4 columns on the table component...
Fetch columns first column to fifth column excluding 4th column...
Write below code PostFetch of table Component.
function removeColumns(cdaData) {
var valueColIndex = 3;
//var valueColIndex2=2; /*initializing 2nd colum with its index */
//var valueColIndex3=1; /*initializing 1st column with its index */
// Remove metadata column
cdaData.metadata.splice(valueColIndex, 1/*remove count*/);
//cdaData.metadata.splice(valueColIndex2, 1/*remove count*/);
//cdaData.metadata.splice(valueColIndex3, 1/*remove count*/);
// Remove resultset column, from each row
cdaData.resultset.forEach(function(row) {
row.splice(valueColIndex, 1/*remove count*/);
//row.splice(valueColIndex2, 1/*remove count*/);
//row.splice(valueColIndex3, 1/*remove count*/);
});
// Return modified cda data set
return cdaData;
}
Write below code in Pre Execution of Table Component
//Specify the columns which you are removin
function f() {
this.chartDefinition.readers = [
{indexes: 3 /* Value2 */},
//{indexes: 1 /* Value2 */}
//{indexes: 2 /* Value2 */}
];
}
Alternative solution which will reduce writing above code :
Write below code in "Post Execution" of table component. column indexes start from 1 ,2,3 and etc if you write this code.
function myTip()
{
$(th:nth-child(5),td:nth-child(5)).hide(); //hides 5th column
$(th:nth-child(),td:nth-child(10)).hide();//hides 10th column
}
NOTE:
1) Query fields indexes start from 0 and ends with N-1 where N is the number of fields coming from query.
2) You can fetch as many columns from the query result set as you want.
3) See the commented code to remove the other columns...
NOTE that the code in Pre Execution may not accurate but worked fine for the requirement.
Thank you.
References :
1) http://forums.pentaho.com/archive/index.php/t-143075.html
2) http://forums.pentaho.com/showthread.php?143075-specifying-columns-for-pie-chart-in-CDE
3)http://www.webdetails.pt/ctools/charts/jsdoc/symbols/pvc.options.charts.Chart.html#readers
Wednesday, February 11, 2015
Remove WaterMark from Visual lightBox 5 x and latest version

Hi Users today im telling you how to remove watermark from Visual Lightbox and you can also remove watermark from your publish project. It is very easy to remove but just follow these steps:
1. Download and install your Visual Lightbox from here: Download
2. After installing Visual Lightbox create your project and publish to your destination folder
3. After publishing the project go to your publish project and find "visuallightbox.js" which is locate at "your publish proct folder/index_files folder/vlb_engine folder" and open "visuallightbox.js" with Word pad and press Ctrl+f and search "visuallightbox.com" and change it to your own website url or remove it like:
For example:


4. after doing that press Ctrl+S and save it.
5. After doing that copy your original image and paste it into "your publish project folder/vlb_images1 folder/" and replace the images.
For example:

your original image convert the old image and it will remove the watermark from image automatically

6. Congratulation you did it.
7. Any complain, Just comment and i will give your ans in 2 to 3 hour....!
8. Thnx users for reading i hope you will like it......!
Wednesday, February 4, 2015
AS3 Play Sound from Library
claps.wmv
*Sound loop created by Brad Sucks.
In this tutorial, were going to learn how to use ActionScript 3 in order to control audio files imported into our Flash documents library. This lesson comes with an audio file, which you can download from the link above. The file is named claps.wav, which is a short 4-second sound file that can be used as a sound loop. Well also learn how to loop a sound clips playback in AS3 using the Event.SOUND_COMPLETE event associated with the SoundChannel class.
Step 1
Lets start by creating a new Flash ActionScript 3 Document.
Step 2
On the stage, lets draw 2 buttons - a play button and a stop button. Lets give them the instance names play_btn and stop_btn respectively. You can give a button an instance name by selecting it, and then going to the Properties Inspector where you will find an input field for the instance name.
Step 3
Once you have the buttons, lets go ahead and import the claps.wmv audio file into the Flash documents library. From the main menu, choose File > Import > Import to Library. Navigate to where the claps.wmv file is in your computer and import the file. When importing is done, you should see the audio file in the Flash documents library.
Step 4
At this point, lets set up the sound file in our library so that we will be able to access it using ActionScript. To do that, right-click on the sound file in the library and choose Properties from the context menu that pops up.
When the Sound Properties dialog box comes up, go to the part that says Linkage. If you dont see this area, click on the Advanced button at the bottom of the dialog box. Once you see the Linkage options, make sure that the following are checked:
- Export for ActionScript
- Export in frame 1
Step 5
After weve checked those options, youll see a couple of input fields become accessible right below the check boxes. Go to the Class input field and change the name to Claps. This allows us to create a class from our audio file. We will use this class in order to create an instance of our claps.wmv sound file, so make sure you remember this name (Claps) because we will use it later on.
Step 6
Double-check to see if youve set everything up properly and then click on OK. You will then get a message that says: A definition for this class could not be found in the classpath, so one will be automatically generated in the SWF file upon export. Click on OK so that the Claps class will be generated once you export your SWF.
Now that the sound file in our library is properly set up for use with ActionScript, lets go ahead and write some code.
Step 7
Create a new layer for the Actions, select the first keyframe of that layer, and launch the Actions Panel.
Step 8
Lets go ahead and create an instance of the claps.wmv sound. Remember that the class name we specified is Claps. So type the following line in the script pane:
var clapsSound:Claps = new Claps();Step 9
Next, lets create mouse click event listeners for our play (play_btn) and stop (stop_btn) buttons:
var clapsSound:Claps = new Claps();

play_btn.addEventListener(MouseEvent.CLICK, playSound);
stop_btn.addEventListener(MouseEvent.CLICK, stopSound)

function playSound(e:MouseEvent):void
{

}

function stopSound(e:MouseEvent):void
{

}
Step 10
Inside the playSound event listener function, lets use the play() method of the Sound class in order to instruct the sound to start playing once the button is clicked:
function playSound(e:MouseEvent):void
{
     clapsSound.play();
}Step 11
For stopping the sound, well need to create a SoundChannel object first. And then well need to assign the play sound statement to that SoundChannel. And then to stop the sound, well use the stop() method of the SoundChannel class:
var clapsSound:Claps = new Claps();
var clapsChannel:SoundChannel = new SoundChannel();

play_btn.addEventListener(MouseEvent.CLICK, playSound);
stop_btn.addEventListener(MouseEvent.CLICK, stopSound)

function playSound(e:MouseEvent):void
{
     clapsChannel = clapsSound.play();
}

function stopSound(e:MouseEvent):void
{
     clapsChannel.stop();
}In the next part of this article, well learn how to make the sound clip loop.
Making a Sound Clip Loop in AS3
If we want to make the sound loop, well need to find a way to be able to tell it to play again once the sound has completed the playback (i.e. when it reaches the end). We can use the SoundChannel class to achieve this. The SoundChannel class has an event called Event.SOUND_COMPLETE. This event gets dispatched whenever a sound thats playing in a SoundChannel has completed playback. So we can create an event listener for this event, and then tell the sound to play again once this event gets dispatched (i.e. tell the sound to repeat when it reaches the end).Lets go ahead and create the event listener function first. Lets name it loopSound. Inside this listener function, well instruct the sound to play again. So well need to add another play sound statement inside this function:
function playSound(e:MouseEvent):void
{
     clapsChannel = clapsSound.play();
}

function stopSound(e:MouseEvent):void
{
     clapsChannel.stop();
}

function loopSound(e:Event):void
{
     clapsChannel = clapsSound.play();
     trace("The sound has reached the end");
}
If youre registering an event listener function to the Event.SOUND_COMPLETE event of the SoundChannel class, you must add the event listener only AFTER the sound has been assigned to the SoundChannel (i.e. it must be added after the SoundChannel = Sound.play(); statement). In our exampe, the first time the sound plays will be when we click on the play button. So we must add the Event.SOUND_COMPLETE statement after the play sound statement inside the playSound() function:
function playSound(e:MouseEvent):void
{
     clapsChannel = clapsSound.play();
     clapsChannel.addEventListener(Event.SOUND_COMPLETE, loopSound);
}So now, go ahead and test your movie. When you click on the play button, the sound will start playing. And then when it reaches the end, you will see a message from the Output window (from our trace statement), and the sound will immediately play again.
After youve tested the movie and played the sound, you will notice that the sound will only repeat ONCE. After the second time it plays, it will no longer repeat itself. So here, you will realize that the Event.SOUND_COMPLETE listener will only listen out for the event one time. Its not going to keep listening out for Event.SOUND_COMPLETE indefinitely.
But what if we want it to listen out for Event.SOUND_COMPLETE indefinitely so that we can make our sound loop indefinitely as well?
In order to do that, well need to add the event listener AGAIN after it begins playing another time. So well need to add the Event.SOUND_COMPLETE listener inside the loopSound() function as well:
function loopSound(e:Event):void
{
     clapsChannel = clapsSound.play();
     clapsChannel.addEventListener(Event.SOUND_COMPLETE, loopSound);
}And that concludes this tutorial on how to play sound from the library using AS3 and AS3 sound looping