Wednesday, February 18, 2015
Java program to check whether a number is prime or not

class prime
{
public static void main(String...s)
{
int n,i;
n=Integer.parseInt(s[0]);
for(i=2;i<n;++i)
{
if(n%i==0)
break;
}
if(i==n)
System.out.println("
Number is prime");
else
System.out.println("
Number is not prime");
}
}

Sunday, February 15, 2015
Best Way to Easily Find and Remove Broken Links from your Website or Blog

What are Broken Links?
Broken links are the links which leads to a page that actually does not exist. When you publish any article on your blog than search engines like Google indexe it and add your article information to its database. After some days or months if you delete your previously published article than it is removed from your blog database but not from Google database. If anyone search for a keyword related to your article on Google than your article link come up in the search results. And if he/she clicks on the link then it leads to a 404 error page.Also Read: The Top 10 Websites to create free Logo for your Blog
Also Read: Tips on How to Have Better SEO Results with Link Building
How to Find and Remove Broken Links?


Thursday, February 12, 2015
Want to install Mac OS or any other linux OS and still be able to run your windows applications Read this
Virtual Machines vs Parallel Installations
I spent the entire day today in the realm of proprietary software setting up my MacBook laptop to run Windows XP Professional via Bootcamp. Having now used Virtual Machines and Parallel/Dual-Boot installations on a couple of machines I wanted to take a few minutes to share my experiences and thoughts on the subject. For those of you not familiar with the concepts, Virtual Machines or vmware and parallel installations are two different methods of running multiple operating systems from a single computer. This can be done either on a desktop or on a laptop and has both open source or proprietary options.
The ultimate decision of which option to go with will depend greatly on the individual’s usage habits and preferences. In my case I’ve grown to appreciate the advantages offered by parallel installations over vmware.
VIRTU
Virtual machines, or vmware, are an innovation that enables you to run one operating system within another. This process relies on the presence of a vmware program, such as VMware Fusion for Mac, or VirtualBox for Linux, and creates an instance of a “guest” OS that can be booted from within the “host” OS.
In the case of both proprietary and open source options, you begin by first installing the virtual machine software. Once this has been done you create a new virtual machine within the Vmware program. The steps to add the guest OS will depend on the Vmware software, but generally speaking there will be a few steps involved in which you identify what the host machine will be (Linux, Mac, or Windows) and designate how much RAM you wish to make available.
Once this has been done the the bulk of the process is extremely similar to that of a standard installation on a brand-new machine..
When you want to login to the guest OS, it’s just a matter of loading the Vmware program and selecting the operating system from the list of available options.
Advantages: Virtual machines give you access to two operating systems at once, and therefore expand the available functionality you have access to. Often times software is not available for all platforms, so use of virtual machines would enable Mac Users to run Microsoft Outlook for example; or Linux users to run Adobe Photoshop, or RPG games.
Virtual machines can also be moved or deleted exceptionally quickly because from the perspective of the host machine they are just one large file. The Instance of Windows XP I had previously installed on my MacBook was a single 25 GB file for example.

VMware for evaluating new systems: One of the key benefits of virtual machines – which I continue to use – is as a quick way to evaluate new operating systems and Linux distributions. I am constantly tinkering and test driving new distributions in a never ending quest for new and interesting features. By installing new OS test beds as virtual machines I’m able to quickly and easily explore them without making any fundamental changes to my system.
If I decide I don’t like the OS, I can delete the virtual instance without any adverse impact to the host machine.
Disadvantages: Due to the nature of the technology, use of Vmware represents extra burdens on your system than exist normally because you are using the same limited resources to run two operating systems. As a result programs on the host machine will not run as quickly.
Drivers are another big issue – particularly for Linux/Windows installations. Many hardware manufacturers do not produce drivers that support Linux-based operating systems the open source community has had to develop them themselves. In some cases – particularly webcameras – drivers are still being developed; and the versions that are currently available require more advanced computer skills to get running.
In my case the expertise required to implement the drivers is above my skillset, so I’m not able to use my Logitech Webcamera while logged into Ubuntu.
In the context of the discussion on VMWare, guest machines get their drivers and hardware information from the host. So despite the fact drivers are widely available for Windows, if you’re running XP as a virtual machine within Ubuntu you’re not going to be able to use the webcamera. This isn’t the case with parallel installations because the extra layer of the host-guest relationship doesn’t exist.
PARALLEL INSTALLATIONS
With Parallel Installations or Dual-Booting, you are running two completely separate operating systems on one box. In this case when you first power-up the computer you are prompted to select which system you wish to log into. Once logged in you will only have access to the software components that you’ve installed on that specific OS, and not both (as is the case with virtual machines).
Historically setting up a dual-booting system has been fairly complicated – especially for new users. However increasingly software companies have begun to ease the process.
Mac’s new Leopard release for example (OS 10.5) comes with a utility known as Bootcamp, which vastly simplifies the set-up process for installing Windows machines in parallel. The set-up is largely wizard based and takes you through the process of re-partitioning the harddrive to make way for the new Windows instantiation, and then rebooting into the Windows install process.
Additionally Ubuntu has gone one step further by enabling insterested parties to test drive the OS without actually installing it, to install an instance within Windows, or dual-boot the machine.
Advantages: One of the main advantage of parallel installations is the fact you can dedicate 100% of your system resources to the host machine. As a result programs and the operating system in general run much more quickly.
Secondly, and equally importantly, is the fact that you don’t face the same driver issues in dual-booting that you do in vmware. For example, if Linux is your OS of choice you can use Ubuntu as your primary default OS, but revert to Windows XP for web conferencing. (That said there are of course existing open source options for Linux users; this option is just one possibility.)
Finally though perhaps trivially, you won’t face issues of keyboard shortcuts with nearly the same frequency as virtual machines.
Disadvantages: Unlike virtual machines which are housed within single large files within the host machines folder heirarchy, parallel installations require dedicated partitions to function. So the process of setting up a dual-boot machine requires additional steps that change the landscape of your harddrive rather than working within the pre-existing conditions.
These changes can be undone later to a degree; but re-partitioning of a harddrive is never to be taken lightly. So this factor should be borne in mind (e.g. back-up first!)
Secondly you are restricted to the software and functionality of one operating system at a time.
MY OPINION
Having used both options on a few different machines I personally prefer dual-boot systems over virtual machines for general usage (as I said there is just no beating vmware for testbed installations). While it is nice to have the ability to quickly access PC software from the Mac without having to do a full restart, I found it cognitively difficult to work between the two operating systems within one environment.
For one, while in XP the key-board shortcuts were a hybrid – not quite PC, and definitely not Mac. So I was constantly making mistakes when typing that resulted in a loss of efficiency over time. I’ve heard that you can remap keys; but to be honest I wasn’t in love with vmware enough to bother.
Having set-up the same laptop with XP dualbooting through Bootcamp on the other hand, I’m much more pleased with the set-up. On my home machine I’ve got Ubuntu dual-booting with Windows XP Media edition AND a virtual instance of XP running within Ubuntu and have found that I never use the virtual machine. To me there’s nothing quite like logging into the full operating system.
But as I said, it all comes down to user preferences.
Previous Posts @ TechTicker:
Wednesday, February 11, 2015
C program to check given alphabate is vowel or not using switch case

#include<stdio.h>
#include<conio.h>
void main()
{
char ch;
clrscr();
printf("Enter an alphabate:");
scanf("%c",&ch);
switch(ch)
{
case a:
case A:
case e:
case E:
case i:
case I:
case o:
case O:
case u:
case U:
printf("The alphabate is vowel");
break;
default: printf("The alphabate is not vowel");
}
getch();
}
Tuesday, February 10, 2015
Kettle transformation as data source in Pentaho CDE OR Excel sheet as data source for pentaho CDE dashboard
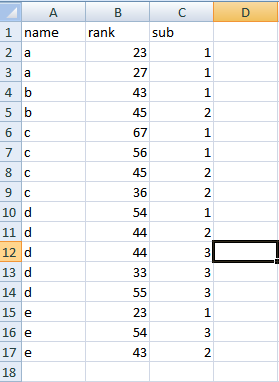
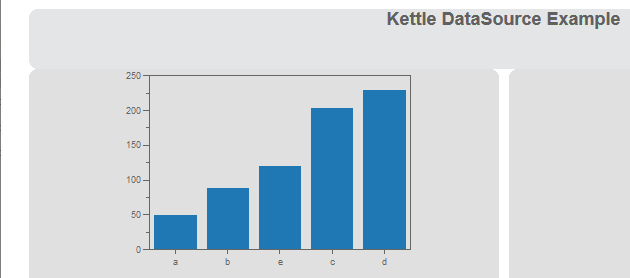
Data display should be grouped by name .
NOTE:
Save your kettle file in the folder where you also saving the CDE files.
i.e., Generally in 4.8 BA server
under pentaho-solutions/your project(dashboard) folder. Bz you need to pick the developed .ktr file from data sources section.
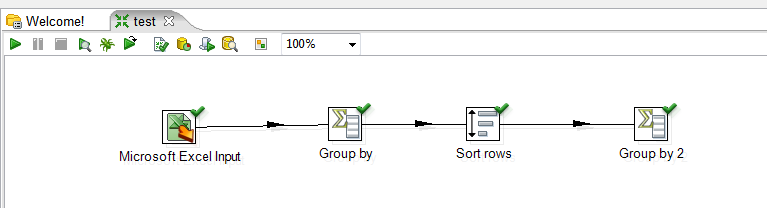
1) Drag an drop Excel Input step.
Design-> Input -> Microsoft Excel Input ->
2) Double click on Microsoft Excel Input step and Browse for your excel file and then Add.
3) Drag and drop "Group By" step from Design->Statistics
Double click on it and select Group field as name
In the aggregates select as below
Name Subject Type Value
name rank Sum
4) Connect the two Steps( i.e., connect "Microsoft Excel Input" and "Group By" with an Hop.
5) See the preview (Use Debug this transformation).
6) Sort the output that you got from step 5.
Drag and drop "Sort rows" step from Design ->Transform.
connect "Group By" step to "Sort rows" step using a hop.
7) After sorting add another step say "Group By 2" to your transformation and now see the preview of the transformation.
Kettle Design Image:
Down load source code of this example here
References :
Pedros blog post:
2) http://pedroalves-bi.blogspot.in/2011/07/elasticsearch-kettle-and-ctools.html
Tip Pie or Bar Chart No visulization when the sql result is having all 0 values in Jasper iReport
Recently I came across a situation on plotting the 0 values result set on a pie chart and failed to produce the chart with out leaving any message.
Alternatively I have shown a message saying that "All the values in the result set are zero so can not plot the visualization".
Of course, this is not a big matter to blog but I can say that this is a best practice in report designing and would like narrate for the one who wish to follow best practices.
Your end-client can easily understand when the chart is having all zero values.
Example :
Query : SELECT field1, field2, field3 FROM dummyTable
Output :
field1 field2 field3
---------- --------- ---------
0 0 0
For instance assume you are showing data on pie chart and given expressions in 3 different series lets say "series1", "series2" , "series3".
Now, if you see the preview of the report, you will be getting nothing in output as your query resultset has all values as 0

Drag and drop the "Static Text Field" over the chart from palette section and write your message(message is : All values are zero so can not plot the visualization) and Print this field when ever the values are zero.
For doing this, you have to Write similar like below expression for "Static Text Fields" PrintWhenExpression
($F{field1}==0) && ($F{field2}) && ($F{field3})
Observation or Preview.
Now select some input controls for which you will get result set 0 .. You will get the below similar like output.

Thats it... When ever your query result set is having all 0s you will be displaying message saying that can not plot visualization.
Sadakar
BI developer
Tuesday, February 3, 2015
Maxing out at 50 concurrent connections with Play or Netty on OS X Heres a fix
tldr: set the backlog option on Nettys Bootstrap object to a higher value (example).
Symptoms
On OS X, your Play or Netty app cannot handle more than ~50 concurrent connections. A simple way to test this is to use Apache Bench:
As soon as you set the concurrency level (the -c parameter) above 50, youll get the error "apr_socket_recv: Connection reset by peer (54)". Moreover, your Play or Netty app will never actually see the request and nothing will show up in the logs.
However, if you run the same experiment against the same app running on Linux, even with the concurrency level set to several hundred or several thousand, all requests will complete successfully, without errors. Therefore, there must be something OS specific causing this problem.
To be fair, its rare to use OS X in any production or high traffic capacity - for example, at LinkedIn, we use OS X in dev, but Linux in prod - so the concurrency limitation is rarely a problem. However, we had a few use cases where, even in dev mode, we had to make many concurrent calls to the same app, so we had to find a solution.
The Cause
It turns out that "50" is the default size for the "backlog" parameter in Javas ServerSocket. It is even explained in the JavaDoc:
The maximum queue length for incoming connection indications (a request to connect) is set to 50. If a connection indication arrives when the queue is full, the connection is refused.Therefore, whatever code manages sockets in Netty must use different configurations for the backlog parameter on Linux and OS X. This code is likely tied to the selector implementation for the OS: Im guessing the Linux version uses epoll, while OS X uses kqueue. The former probably sets backlog to some reasonable value (perhaps from OS settings) while the latter just uses the default (which is 50).
The Solution (pure Netty)
After some more digging, this StackOverflow thread reveals that the Netty ServerBootstrap class lets you set an option to override the backlog:
If youre using pure netty, just use the code above and the 50 concurrent connections limit will vanish immediately!
Also worth noting: this issue exists in Netty 3.x, but apparently Netty 4.x sets a better default than 50 on all OSs, so upgrading Netty versions may be another solution.
The Solution (Play)
Play instantiates the ServerBootstrap class inside of NettyServer.scala. Unfortunately, neither the class nor the boostrap instance inside of it are accessible to app code. This should be easy to fix via a pull request, but until that happens, and until a new version is available, here is a two part workaround to get moving.
Note: this is an ugly hack with lots of copy/paste from the original Play source code and is only meant as a temporary workaround. It has been tested with Play 2.2.1; figure out which version of Play youre on and be sure to use code from that release!
Step 1: make a local copy of NettyServer.scala called TempNettyServer.scala
Youll want to put TempNettyServer.scala in a different SBT project than your normal app code - that is, dont just put it in the app folder. See SBT Multi-Project Builds for more info.
The folder structure looks something like this: my-app is my original Play app and monkey-patch is a new SBT project for TempNettyServer.scala:
Copy the contents of the original NettyServer.scala into TempNettyServer.scala, with two changes:
- Replace all NettyServer references to TempNettyServer
- In the newBootstrap method, make the change below to allow configuring the backlog option
Now, configure this new SBT project in project/Build.scala:
Step 2: override the run and start commands to use TempNettyServer
Ready for more copy/paste?
Grab PlayRun.scala and copy it into the project folder under some other name, such as TempPlayRun.scala and make two changes:
- Replace all PlayRun references with TempPlayRun: there should only be one, which is the class name.
- Replace all NettyServer references with TempNettyServer: there should two, both in String literals, used in the "run" and "start" commands to fire up the app.
A note on OS limits
After making the changes above, you should be able to handle more than 50 concurrent connections. However, depending on how your OS is configured, you might still hit a limit at 128 or so. This is probably due to the kernel config kern.ipc.somaxconn, which controls "the size of the listen queue for accepting new TCP connections" and has a default of 128.
To tweak this limit, you can run the following command:
Your Netty or Play app should now be able to handle over 1000 concurrent connections (or more, depending on what limits you set above).